Wednesday, July 24, 2019

Cleaning up my Workbench


The Workbench in July 2019
My approach in painting miniatures is simple; Paint something which attracts you the most. The advantage is that you are always highly motivated. Unfortunately, it happens that you loose your interest before a project is finished. You grab the next one or move on to a different project. Therefore, my shelf of shame with all my unfinished projects is a large one. Becoming a Daddy has made things more complicated. My painting time devides into evenings doing the night shift by taking care for our little boy. As I am mostly tired from the day my painting concentrates on doing simple work like basic colours, simple transitions with less colours like in NMM, big surfaces, bases and so on. When having some spare time on the weekend I use it for work which needs much concentration like Freehands, finelining, painting eyes and so on. As you can image I do not have much spare time on the weekends which results in an unfinished miniature accumulation. When you are following this project you already noticed that half a dozen Cold Ones are still waiting to get saddled by their missing knights. However, when I started my work on the Cold Ones some of the infantry troopers become victims of loosing interest. From time to time I continued work on them but finally two executioners and two Witch Elf stuck in the pile for getting their finish sessions. Therefore, I decided that the July will be the month to finish all that stuff from my 4th Edition Dark Elves project that stucks somewhere in my painting pipeline. Lets see what we have here:


Executioners

The Workbench in end of 2018
I started painting the first three Executioners in end of November 2018. Quickly I concentrated on one miniature which left the two unfished troopers behind. My interest then quickly changed to the Cold One Knights and I wanted to paint a test miniature of this cavalery unit. The two unfinished Executioners patiently waited for their time to come.


During that time I had some smaller painting sessions on the hoodies, base and the black leather. Finally, they waited until mid of July 2019 to see a brush again. I started with finishing the chainmail, silver and gold elements, the gems as well as some correction work on all finished parts.


The next sessions covered the axes which were a lot of fun to paint. Finally I painted the leather, base and some battle damage as well as some blood on the axes.

Finished NMM on the two new collegues


I am happy that these two maniacs have joined their collegue to sever some limbs and heads.


Witch Elves

These two girls waited more than half a year to get finished.The Witch Elf in defending position was the last girl from the first rank which I started painting with the two other girls from the left flank in 2018. You can see her leying around in the first executioner picture above. The latter two were quickly finished but the motivation left me to continue with this third one.


The girl with the raising swords is from the second rank and joined her later to motivate me. From time to time I spent some painting time in both but quickly concentrated on this second Witch Elf as she was much more detailed and thrilling to paint.


Again the front rank girl was left unfinished behind. I do not know why this particular Witch Elf had her difficulties motivating me to finish her. I told her story in our Tabletop-Board and some angry members put up the pressure which was necessary to get the job done.


Sometimes a whip is motivating more than hundreds of nice words!

The Witch Elves Unit so far. Ready to shed some blood
       

Dark Elf Warriors

When ever I had some spare times in the early mornings while my little boy still sleeps I had a coffee and continue to prepare some troopers for my 20 miniature Dark Elf warrior unit. It took me a while to collect these very rare metal versions of the Dark Elf Warriors. Now, I am happy that the first 10 miniatures are prepared and ready for painting. I think I am going with some red colours for this regiment.

The first Dark Elves Warriors prepare theirselves for some undercoat


Sorceress on Dark Pegasus and Plastic Sorceress on foot 

Finally, I have a small teaser for you.

Two Sorceresses on their way to lead a new wing of this army


First, the Talisman Sorceress on foot. I get this plastic miniature from ebay. It was painted ok but with very very thick layers of paint and primer. It was hell to get this miniatures stripped from the paint and to prepare her for painting. Because this girl is a bit smaller compared to the metal miniatures, I put her on a bit higher base design to cover her size. Here she comes, ready for painting.


I also prepared the mighty sorceress on black pegasus. The challenge on this miniature was to create a base which supports the impression that this beast is just jumping to fly up into the air. As you can imagine it was a lot of planning and trying to get this heavy metal miniature balanced. But see it by youself.


                                                                       Its all about Balance


I hope you like my progress. As always I am happy to read your thoughts in the comments.

Kind Regards,
GeOrc

Saturday, June 1, 2019

Miniature Preparation and Basing

View on my workbench while cleaning and basing Dark Elf Warriors and Executioners


I spent quite some time in the preparition for some new 4th/5th Edition Dark Elves units. I will take the chance to speak about some of my basic steps in front of painting a miniature. The general miniature preparation comprised the removal of mold lines and sanding. The basing I describe here will focus on joint bases able to display a scenery while also consisting of individual bases for each miniature.

Dark Elves Cold One Knight unit with a consistent basing


Miniature Preparation
I use three tools for the miniature preparation, a pliers for removing a miniature from the casting frame, a pincer, a sharp knife to remove the mold line and sanding paper (graining size 400-600) to get everything smooth and even.

Tools I use for cleaning miniatures


First I remove bigger crap like casted inflow and air channels from the miniature using the pincer. The pincer should have one flat side to get as close to the miniature as possible. Additionally a good pincer has a pointy tip that helps to get into the last corner of the miniature.
Next I clean the mold line useing a sharp knife. For my painting technique it is important to remove it  as completely as possible as the very thin paint layer allows to see irregularities in the surface easily. Therefore, I took a lot of time to clean the miniature properly. You should know that the mold line goes one time around the whole model. There is need to remove it everywhere. Always check the mold line from different angles as I can become invisible when you start to reduce it. Also clean the whole area and try to reestablish the area you are carving on. Be sure that you use a sharp blade. If your blade is damaged if can add a lot of scratches to your surface, sometimes even more worse than the mold line.
Then I use the sanding paper to smoothen the surface and to get rid of smaller scratches. The sanding also help to see if the mold line was removed properly. If the mold line is very small or in case of newer plastics sanding only can be sufficient to clean the miniature.


Assembling
After all parts are cleaned I glue most of the miniature together. It always helps to realize a stringent light situation on a miniature when it is in one piece and based. However, sometimes an assembled miniature can be difficult to paint as some areas can’t be reached for painting. Therefore I keep riders and mounts as well as shields separately in the majority of cases. In the other Hand I try to assemble a miniature as complete as possible.


Basing
Most of my bases start the same way. To leave the given base surface I add an irregular 2 mm cork layer which allow me to enlarge the base surface when needed and to get an irregular surface. The Cork layer also helps to link different bases as I do often to cover the individual bases in a unit.

Bases with cork layer get an Milliput layer for closing the surface


I use cork because of its irregular edge looking like a stony structure. Because I need only the edge and do not want the surface structure I close the latter by adding a thin layer of miliput. I also add this layer of putty on the remaining areas of the original base. I let everything dry and the start to structure the base. For the high elf ruins I created here I add different structures:

Temple ground
Here I used ready to use plates from Juweela. These were glued using PVA glue on the surface. Make sure to put them in a diagonal way or with some angle and avoid an orientation at the original base. When everything is dried use a pincer to remove the overlaying parts of the plates. Then I add bird sand to cover edges and remaining plain areas.


Stone path
Here I used some bigger structures based on GW basing material. You can use these in their original form or make a mold of these and cast them with gypsum. Here I used the latter. I enlarged the stone path pattern by adding a layer of miliput. As soon as the smooth layer starts drying I carved the stone structure into it using sculpting tools and a needle. Before completely dried I smoothed the whole sculpting to give it its finish look. Again I used bird sand to cover the edges and remaining areas.


Bigger ruins
For the General on Cold One as well as for the Warhydra base I created a scenic base of a fallen high elf architecture. On one hand I used casted gypsum copies of GW architecture and on the other hand I created some own architecture by carving it completely by myself from a bit of gypsum. For the latter I do a design on paper first which is transferred on styrofoam sheets which I used to create a mold. I cut out the shape to create the rough negative which is then casted with gypsum. Then the details are carved into the still humid gypsum using sculpting and carving tools.
In parallel I created the rough shape and final surface of the base using cork layers. Then the bigger pieces were glued on this armature. I used Juweela stones to create more wall fragments and used them for wall debris. After the stones were glued in place I filled the gaps and covered the surface with Milliput. Again I glued birdsand on the surface for creation of finer structures. I used a birdsand mix with more bigger stones around bigger stones and debris. An other mix with more sand amount I used for the plain and free areas.


Priming
I used a two component undercoat for priming. For that I prime first with black primer and second with white primer. this way of priming combines the advantage of a light undercoat helping to intensify colour saturation with a rough surface helping to work with thinned colours needed for qualitative blending.  


The black undercoat should be a thin but closed layer. If necessary use thinned Chaos or Abbadon Black and a brush to get a closed layer. When everything is dried use white primer to add a kind of dusty second layer. It is importat that this layer is not closed as the first one. The miniature appears greyish and dusty.

So far my way to prepare miniatures for painting. Let me know what you think in the comments.

Kind Regards,
GeOrc 

Wednesday, May 1, 2019

The Warhydra


Limited / Unreleased Dark Elves Warhydra
In the beginning of April a contest was launched in the Oldhammer Facebook Community. #makeatrish asks for painting a Miniature of the queen of monsters herself Trish Carden. As Trish was responsible for all of the Dark Elves Monsters from 4th Edition it would have been a pleasure to participate this contest with one of these creatures. I checked my collection and aske myself what is possible to realize in such a short time of a month. Definitly something without a rider and quickly my decision fell for the Warhaydra. Luckily I have already one lying around already prepared and with black undercoat. This miniature was abandoned when the 6th Edition of Warhammer Fantasy was released and the Dark Elves get their update. Since 18 years this miniatures sits on my shelve of shame and waits for its comeback. Here we go!


The miniature:
As initially already described the Warhydra was designe by Trish Carden as part of the initial Dark Elves Release for the 4th Edition. Unfortunately, this miniature was for a long time unreleased and later in limited sales on US Games Day 1999 and for a short period in Italy. Consequently, this miniature is quite rare. The initial Design included also a Dark Elves Sorcerer Lord riding this beast on a howdah. This Sorcerer itself on foot can be seen in a lot of armyshots in the armybook and in White Dwarf articles. In contrast the warhydra or in combination with the sorcerer as rider never find its way into one of the Games Workshop publications. Therefore, no offical reference picture from the catalogue can be shown but Trish released some pictures of her greens on her facebook site:

                              Original Greens of the Warhydra from Trish Carden
                       

and some references from the Stuff of Legends website and the collecting citadel miniatures site exist:


Assembled Warhydra


                              Warhydra Blister pack                                               Right front leg variants


Preparing the miniature and Basing
I bought the miniature a long time ago and it was already prepared and coated black for painting. Then, 6th Edition of WFB was released and with it the new and fantastic miniatures sculpted by Chris Firtzpatrick. The Warhydra was abandoned and moved from the shelves of shame into the box of oblivion. When I freed it from this precence I did not changed much. I removed some more moldlines I forgot and added the second dusty white coat to it, making it ready for painting. I saw later during the painting that I forgot some more moldlines. This is something I definitely have to check, when I will paint the other hydras from my collection.


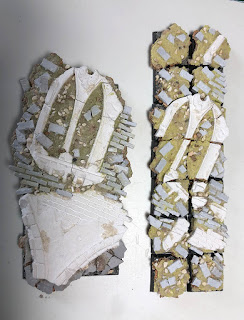
Warhydra base and the used unit reference base

Because the Warhydra came on a big 50 x 100 mm Base it was clear that this time I will have the chance to play a lot more with the high elves ruins. Therefore, I planned to create a big debris field which should still include some larger fragments, recognizable as high elf architecture. One year ago I already did some experiments when creating a unit base for my 6th Edition Black Guard. I used their look as a blue print for the Warhydra Base. The window arcs were already casted and the gate arcs were left from an older project. Fortunately, the brick size of this bit was identical with my juweela bricks. I decided to put everything on a sloped ground. This required a cork armature. I did two test, one with a lot of 2 mm sheets an one with two layers of a cm of a rougher cork plate. The latter resulted in smooth surface with a good side structure hiding the different layers. The other one resulted in more flexible surface but with a partly visible layers side structure. However, I decided for the latter as the the different thicknesses of my gypsum elements required a more flexible surface. I arranged the armature and the elements in way that these create one fallen building front. With additional Juweela bricks I created additional broken walls as well as the transition between the gate and the window parts. Randomly distributed bricks give the base a more scattered look. For the fine details I used bird sand which I glued with PVA glue on between the larger and smaller elements. Some plates I normt used for my floor designs I used as surface in the lower end of the base. This element displayed the original floor and build a bridge to the other base designs of the army. The base was painted in my typical colors for the high elf ruins.


I was very unhappy about how the shattered plaster turned out. It looked unnatural on one hand and the light white pulled to much attention. Therefore I decided to cover the whole are with additional debris. To give this larger area an eyecatcher I added an element from the High Elf Sorcerer sprue. I masked the painted areas with tape and coated the new elements. The result looks very promising and should help to fill the back side of the base where only the raised tail dominated the scene.


Painting the Beast

First color test using the light green scheme from the Cold One

Already very early I wanted to paint this beat in the light greens I used on some of the Cold Ones. On one hand beacuse I wanted to reproduce my beloved light green variant on a bigger surface and also because this colour scheme is very similiar but a more conetmporary version of the one I used on my warhydras I painted 20 years ago. I started painting on one of the flanks and did the same as already described on my Cold ones. One additional element of the hydras are the pustules and holes. The pustules mark some transitions between scales and skin. The holes aspread randomly all over the skin. I decided to paint the pustules in purple as the Cold One already have shown that this color matches perfectly with the light greens. I used Liche Purple as basic color and shaded with the shading mix. The highlights were painted with Warlok Purple. Finaly I put some small white spots on each pustle as a reflection point. The holes were painted in the skin color and shaded first with Incubi Darkness and then with the shading mix to the top. The edge around each hole I highlighted with Bleached Bone. Using these color for the different elements I worked around large surface of the hydra in smaller spots. Finishing smaller clusters helps you to stay motivated as the finished parts will give you an idea about the final result. After weeks of painting skin and scales it became clear that an eyecatcher is missing. There was need add something draw
Warhydra before adding additional colors on the heads
your eyes to the interessting parts of the miniatures, the heads. I had a longer discussion with my community on Tabletopwelt where I show my progress in an Army Project. I learned from the discussion that some variation and some warm colors on the heads would help. I also developed with some of the people the idea to use one of the open mouths for an fire OSL effect. I made some first tests on one head and the first results looked promising. However, I stoped here and decided to move on with the rest of the skin and scales. After spending more time on the skin and scales of the other flank, necks and heads only the details of the heads and claws were left. The latter were already primed in Bleached Bone. I shaded the first with Geaveyard Earth, then with Scorched Brown anf finally with the shading mix. Some highlights using white and the claws made a good appearance. Now only the challenge with 4 of the 5 heads stand in my way to finish this beast.


The Head Challenge

Warhydra after adding warm colors on the heads as eyecatcher
I painted the mounths with Dwarf Flesh and used this color also as a glaze on the areas of the lower and upper jaws. This color already added some warmth on the heads. I shaded everything useing Liche Purple and highlighted with using Dwarf Flesh again as well as with Bleached Bone. For the darker shades as well as for the black linings to seperate teeth from jaw I used my shading mix. The teeth were painted similiar as the horns and claws described earlier. To get a smoother transition between the warmth colors I blended the skin tone into as well as in regions close to the scales some Hawk Turquoise into the Dwarf Flesh. In the rear part of the head sometimes darker shades were necessary where I used Incubi Darkness. It was a very complex and chaotic blending action to get all these colours into each other. But, in the end the result works very good and I had the eyecatcher I needed. An additional eyecatcher was the object source lighning (OSL) effect on one ofe the open mouths. Here I painted a transition from white to yellow to organge to red from insode to outside of the mouth and tongue. This effect add some firery glowing to the mouth. Unfortunately, the effect only works when you look directly into the mouth. However, it was a nice try.


The union
After everything was painted it was time to bring miniature and base together. As I prepared and painted both individually results in a miniature which does not fit properly on the base. There was need fill some gaps and to cover parts between the claws. Therefore, I add some additional basing material after glueing the miniature on the base. I primed everything with a mix of neutral gray and Valejo matt medium. The latter helps to give the paint some more texture allowing a better blending on it. Then, I painted it as all other ruins on the base. Finally I added some grass and more details to give the scenery a more natural look.


Finally, painting this miniature comes to an end. There are a lot of things I dislike on it like the missing of an overall light situation, a basing fitting better the color scheme as well as a color scheme which works better on this miniature. However the goal was to realize the light greens on a bigger surface and this goal was reached. I learned a lot and I have a couple of hydras left to do better. But beside all this critic, it is a lovely miniature and a great addition to my growing 4th Edition Dark Elves Force. I would be hapyy to read what you think, so please leave some comments.

Kind Regards,
GeOrc