Monday, June 6, 2022

Golden Demon series - Beast & Master 2004

We are in the year 2004. Since half a year now I am in a new relationship. I finished my intermediate diploma in chemistry last summer. But, I decieded to change the focus of my further studies to food chemistry. I started into my second semester and everything runs smoothly.  My girlfriend just changed her university and continued her study of economics in Stuttgart. We saw each other on the weekends... and I had plenty of time during the weeks to paint miniatures. 

It´s summer time and only a couple of months before the next Golden Demon competition. The last months my focus was primary on sculpting. When I did some painting it was focused on painting the castings of my greens. I also ran a small buisness selling castings of my own designs. That all keeps me very busy. My shelve of shame grows and the updates for my website got more and more delays. But as the date for the Games Day 2004 came nearer my competitive side awoke. I wanted to defend my title as a good painter. I would not be one of these guys wining a Golde Demon trophy and disappear afterwards. I would not be a one hit wonder. I would show that I climbed that stage to stay!


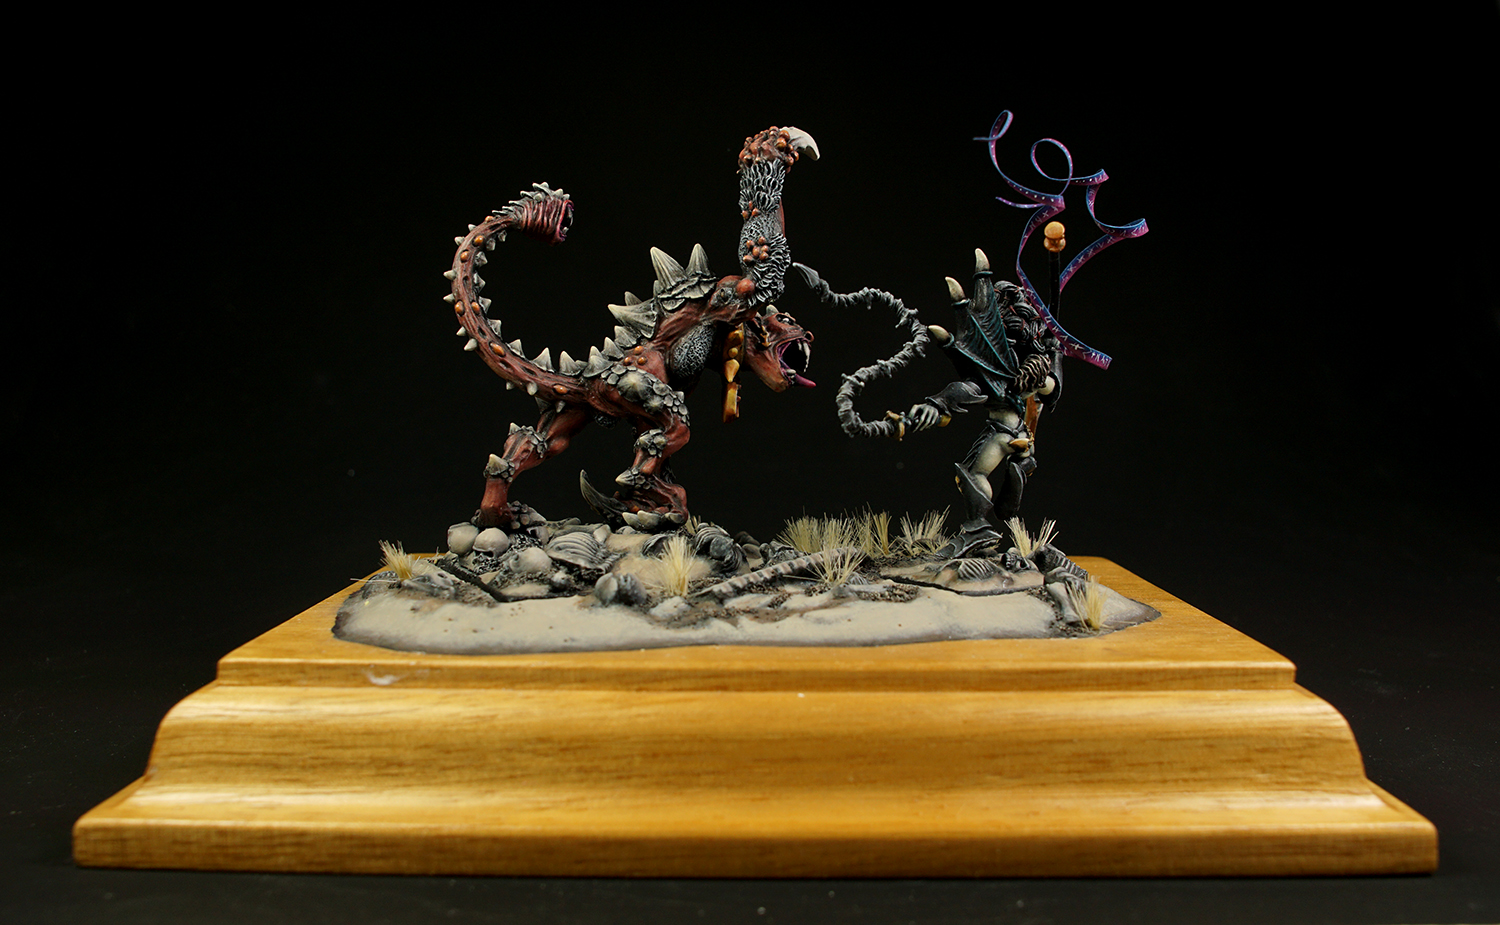
Duell - Beastmaster fighting Scyla Anfingrimm

It was time to throw all my new skills into the next round. My heart still beat for the new Dark Elves range sculpted by Chris Firtzpatrick. More precisely it beat for everything sculpted by Chris Firtzpatrick. With the 6th Edition - Storm of Chaos campaign the Dark Elves got a new armylist containing Slaanesh Elements. It was a great chance to extend my Dark Evels by a further army which fascineted me. I had already a couple of Chaos miniatures I liked and now it was the chance to include them into my growing army or to use them as opponents. From this mixture of models on my workbench the idea of a beastmaster character fighting against Scyla Anfingrimm was born.

Creative Chaos on my Workbench

Normally, it is hard to remember all the details how these project were done nearly 20 years ago. But, during these time I was already writing articles for my website and was also invited to write for the Druchii.net monthly e-zine. There most of the information were conserved. Read this ancient article here with some minor revision and language editing. 


From Druchii-net monthly Nov. 04

The beastmasters of Karond Kar control the most vicious monsters to be found in the Warhammer world. No beast can escape their cruel teachings, even the strongest willed monster will break under their barbed whips. The bound monsters are then unleashed against the enemies of the Dark Elves. Only the strongest beast handlers survive long enough in their dangerous profession to rise to the rank of beastmaster. The most infamous one is without a doubt the beast lord Rakarth of Karond Kar, riding his black dragon Bracchus. Rakarth also broke Seraphon, the mount of the Witch King himself.

Many worthy beastmasters have risen within the walls of Karond Kar. The greatest among them master the wild manticores, either to ride them to battle themselves or to sell them to high-bidding highborns. They also raise the black pegasi favoured by the convents of sorcery, and the great war hydras are cornerstones of the raiding and siege forces of the black arks. Beastmasters are dangerous by themselves, but that threat is multiplied if their “pets”, which fight to the Death for their Druchii
masters, accompany them.

The first beastmaster I would like to present is a conversion of a 40k Dark Eldar beastmaster, whom I converted for the Diorama category for the German Golden Demon 2004. I liked the 40k beastmaster ever since his release. The miniature was my long-time favourite cast of my great role model Chris Fitzpatrick. The hair, for example, has been adopted for the witch elf range. Therefore, the model already fits the new Dark Elf range well, but I needed to get rid of some of the technological elements and the overall impression had to become more emblematic of the Dark Elves. To fit into the much newer range of Dark Elves, a few conversions were necessary.


Conversion

First, I cut off all Dark Eldar elements that looked futuristic or technical. As weapon, I chose the typical weapons of the beastmaster, the whip and spear. The spear I wanted to do myself, but for the whip I chose a nice Games Workshop bit. Kazagh’s whip is a really good one. After I repaired all the damage done by cutting off the non-fitting parts, I started to remodel the armour to make it more Druchii-like. The cold one knights, from which I took the boots and spikes on the vambraces, inspired me strongly.The Idea for the thigh braces I got from Lilith Hesperax, whom I converted already for the Golden Daemon 2003. With regards to this piece of armour I converted the torso and arm pieces as well. The added skulls on the leg bracers came very late, as the rest was already finished. Once again the cold one knights were parents to this idea. Finally, I bolted the whip and modelled the parts of the hilt.


Spear

The idea for the spear sprang from a doodle I did while talking to my girlfriend on the phone. Crucial were the three points, two of them should have blades facing each other. One of the blades should spiral the shaft like Morathi’s Heart-Piercer. The idea with the points on the shaft came during the sculpting. I wanted to go as far as possible from the Games Workshop design to give the miniature my personal touch. 


Step 1: Shaft and blades
For the shaft I used 2 mm strong wire that I cut with my jewellers saw to the correct length. I looked to the other Dark Elf spears for the measurements so the weapon would not get too big. Because of the spiral form, I decided to fit the second blade as well. For that, I used thinner wire and spiralled it around the thicker one. Then I bent the
wire parallel to the first blade and cut it with some pliers diagonally to get the correct length. 

I removed the part and began the modelling of the large central blade.


Step 2: Sculpting the blade
For all sculpting I used brown stuff, as it gets harder than green stuff and is then easier to polish. I started with a rough shape, 


which I cut smoother with a sharp knife after it had solidified. Then I sculpted the whole thing cleaner. After the stuff had hardened, 


I once again cut it to shape, especially the point. Finally, the sculpt was polished with water sand paper (you know, that special kind which you wet before using). 


Step 3: Second blade
First, I covered the wire with Brown stuff to have a workable base. Then I had to fix the spiral. To do this, I sculpted the spiral form given by the wire. 


After it had solidified, I polished the sculpt to get a smooth surface from the brown stuff. Now it was time to sculpt the actual blade. Here I used the same process as for the centre blade. First a rough shape, solidify and cut to shape. Then sculpt and polish.


Step 4: Third blade
For the third blade of the trident I once again started with a wire skeleton to give support to the modelling putty. To fix the wire I looped it around the central one. I had to make do with one loop, as very little space was left. Then I fixed the wire with brown stuff. After the wire was fixed, I bent the tip into shape as described and modelled on top of it.


Step 5: Shaft points
The shaft points I modelled freehand, which works quite good with brown stuff. I took care to make them smaller towards the end of the shaft and made them look like flesh hooks. Like the rest, they were polished smoothly.


Step 6: Shaft butt
Here the fifth edition spears inspired me. I formed two little brown stuff snakes and twisted them around the shaft. Then I pressed them on with a modelling tool. With a flat tool, I then gave them the right round- and thickness. As these parts were quite asymmetric and unclean, I had to cut and polish a lot. The rivets were added in a second working session.


Finished conversion of the Beastmaster


Step 7: Hand
For the hand I returned to green stuff, as it works better for limbs and parts with lots of curves. Here it was important to position the thumb on the correct position. Always check with your own hand as reference. Further attention should be given to the proportions of the existing hand (if any). For these exact reasons, I had to do the hand two times, but the second time went way faster and smoother.

Step 8: Casting
I did a casting of the spear using a spin casting machine. As I ran the machine regularly these times producing my miniatures it wasn´t a big deal puting the spear into one of my master molds. The rsulting casting looked very good and allowed me to use copies of the spear later again if needed.
 

Casting of the Beastmasters spear
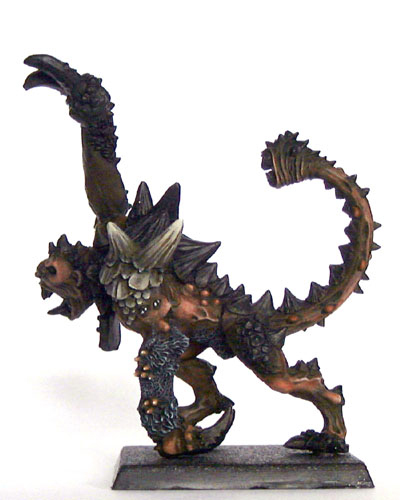
 

Painting Scyla

The Scyla model was left unmodified, as I like it as it is. Good old Scyla had been catching dust for over a year now and finally she had found a worthy place. Painting Scyla Chaosspawn
 

Step 1: Skin
First, I painted all the skin in a similar one to my steed of Slaanesh. On a base coat of chaos black I painted a layer of a Dark Flesh/Chaos Black mixture. This was accented with pure Dark Flesh. Further accents were accomplished by first a Dark Flesh/Dwarf Flesh mix and finally pure Dwarf Flesh. Especially the veins I accented very carefully with pure Dwarf Flesh.

Step 2: Fur
I wanted the fur in grey tones. I started with a mix of Chaos Black and Codex Grey. This would then be accented with Codex Grey and Fortress Grey. A last highlight for the tips and the top hairs was done carefully with Skull White. 

Step 3: Scales, claws and horns
Here I used shades of brown. As my Scorched Brown had dried out, I used a mix of Bestial Brown and Chaos Black. I based all the parts with that. The next highlight was Bestial Brown. For the accents, I was careful to go lighter the further I came from the base, and to keep the deeper parts dark. The scales I accented towards the lower rim. I used the original mix and added gradually more Bleached Bone, adding a final accent of Skull White with a hint of Bleached Bone. The scales were framed with this mix on the lower rim.
 

Step 4: Boils
The boils I had already painted with skin colours. To differentiate them a bit I highlighted them with sunburst yellow. 

Step 5: Collar
I did the collar in NMM gold. For NMM gold, I use the standard Snakebite Leather. This is accented with Bubonic Brown, the final highlight is done in Bleached Bone, and the rims are done in Skull White to hint at the reflections. The sigils of Khorne is based in Red Gore and accentuated with Blood Red. Further highlights were done with different mixes of Blood Red and Bubonic Brown. The edges were done in pure Bubonic Brown.


Step 6: Faces
The final details were the gums, teeth, and eyes. The eyes got a basic Skull White and Chaos Black look. The gums got a base of Nauseating Blue. This was accented with Liche Purple and finally Warlock Purple. After the gums came the teeth, and they were done in the same way as scales, claws and horns in step 3.
 

Painting the Beastmaster


Step 1: Skin
I base with a dark mix of Chaos Black and Bleached Bone. The skin then gets many layers of pure
Bleached Bone. Then I shade the lower parts with different mixes of Chaos Black and Bleached Bone.
The highlight is Skull White, but better is a mix of Bleached Bone and Skull White – that prevents it from getting too light.


Step 2: Armour

For a dark silver NMM I put the highlights a little further from the edges than for normal silver NMM. The first is a mix of Chaos Black and Codex Grey. The follow-up layers are with gradually  more Codex Grey in the mix. I try to avoid pure Codex Grey, as it is difficult to handle. The last highlight I did with a mix of Codex Grey and a hint of Fortress Grey. Then the edges in Skull White to represent the reflecting light.


Step 3: Fur
Here again I took a Bestial Brown and Chaos Black mix. With this I base the front and back of the fur collar. The next highlight is pure Bestial Brown, and for the accents, I use the original mix with more and more Bleached Bone added. 


Step 4: The wing
Here I highlighted the black with a mix of Hawk Turquoise and Chaos Black, the second go with Hawk Turquoise and finally Hawk Turquoise/Bleached Bone. For the after-shading, again I used the original mix. The horns are done in the same way as the fur.


Step 5: Hair and hair bands 

I used first a mix of Chaos Black and Codex Grey. This was then accented with first Codex Grey and later Fortress Grey. A final accent for the tips and the top hairs is done carefully in Skull White. The hair bands are based in Dark Flesh and accentuated with Blood Red

Step 6: The whip
I wanted the whip in a much lighter NMM than the dark armour. To do this, I added a lot more Fortress Grey and later thinned down Skull White to the highlights. In the final layer I used pure thinned down Skull White to get a bright shimmer on the upper side. However, I needed to constantly shade with darker tones to get a good effect. The whip handle was done in the same tones as the wing, the rivets
in the same NMM as the whip. 


Step 7: Metal skulls

The metal skulls I did in NMM gold. For a description of my NMM gold technique, see “Step 5: Collar of the Scyla” painting guide.


Beastmaster half way done, missing only the spear with was painted separately.


View on the spear and gold reflection in the blade.

Step 8: Spear
First, I did the lower blade in NMM gold. Now it is getting a tad tricky, as the gold blade should be reflected in the centre blade. Initially, I painted the lower part of the blade in light NMM, starting dark at the point and getting lighter towards the middle. Then came the gold part, here I started dark at the end and got lighter towards the centre. Furthermore, I accented with grey towards the centre edge. After that, I painted the reflecting edge with a Skull White line. The upper side and upper spear point was done in the same light NMM as the lower part; the bright middle part is walking diagonally over the central blade and has the same angle as on the upper point. Further back is a second reflecting area that follows the same angle parallel to the first one. The small hooks are done in NMM getting lighter towards the tips. The shaft I painted in turquoise tones, using the same colours as in step 4. The golden butt cap is the already described NMM gold.


Step 9: Banners
I decided to include a few long, self-made banners. I cut them from thick paper und painted them in violets. The base is a mix of Liche Purple and Chaos Black, first accent Liche Purple, second with a Liche Purple/Tentacle Pink mix. The flow is always bottom-up, to get a colour flow of dark (bottom) to light (top). Afterwards I added a few Druchii-Runes in Skull White. I glued the completed banners to the spear shaft and had a completed beastmaster.
 

View on the base of Scyla

Step 10: Bases
For the bases of both models I used lots of skeleton parts from the skeleton sprue. Added to that I had a few old skeleton minis of horses and chariots. The whole I glued to a base and sculpted it with thinned down Moltofil. With an old brush, I then washed the skeleton parts out again and brushed it to a mostly smooth surface. I fixed a little sand here and there with some glue. After everything was primed in Chaos Black I painted the lot. First only the sand with a mix of Dark Flesh and Chaos Black. For all following accents, I added more and more Bleached Bone up to pure Bleached Bone. After the sand, I did the same with the Bones, but here the final accent was a mix of Bleached Bone and Skull White. The bird sand I dry-brushed with the same colours.
 

Step 11: Show base
The show base is basically the same as the model bases. Only the dry grass is a special fibre from the modelling hobby, and this I glued to the base with PVA glue.


View on the bases of the miniatures and the show base


Finally a couple of different views on this very special duell scene.


Looking at the duell today make me thinking that I did many things right and it well deserved winning a trophy. There is this huge conversion and sculpting work on the beastmaster giving him a very dynamic pose. A technical high painitnig standard with very smooth blendings on NMM but also on the Beastmasters skin within one colour or on the Skyla tail between two different colours. Also the small banners I created which add some extra details. The showbase gave these both characters a nice atmospheric scene which fit both characters very well. The colour schemes painting the aggressor (Scyla) in warm colours and the defender (Beastmaster) in cold colours support the scene. A lot of these things were not planed and I did somehow right by instinct.  
 
Today I would only add more contrast ot the NMMs which would make them look more real. For sure I would also exchange the Turquoise against anything different but this colour scheme was one of my favorite receipts at that time point. Finally, I would also add more global light. But, I am still very happy with that Duell Scene and in my opinion its look has aged very well.


However, the real diorama aged not so well. Due to the casted spear the Beastmaster had some disbalance and the small wire bended a couple of times before it broke. Several repairs had damaged the link between miniature and the base and a lot of super glue covered the skeleton torso he stands on. Because the Beastmaster did not hold without blu tack it was always very hard to remove the figure. This was necesaary as the beastmaster had a couple of times a use in my games or in showcases. Several times I damaged the showbase when removing him for such events. This article was a great chance to dedust the duell and to repair all these damages. I took the chance to do some new pictures showing this old couple in new glory.


I hope you enjoyed this trip down the Memory Lane. Return to my Golden Demon Gallery or stay a bit and put your thoughts in the comments. So long, train your blendings and happy painting,
GeOrc

Thursday, May 12, 2022

Golden Demon series - 6th Edition - Dark Elves Corsairs 2004

Time to write about my second Golden Demon Trophy. I won this Silver Trophy for my Dark Elves Corsair regiment at the Golden Demon Competition in 2004 in Germany. The regiment was originally part of my first 6th Edition Dark Elves Army which I painted between 2001 and 2003. The Command crew consisting of the Musician, Standard Bearer, Champion and Malus Darkblade on foot had already a first but unsucessful performance at the Games Day 2002 in Germany. Two years later I gave the unit a second try in in Golden Demon Competition in the newly introduced Warhammer Unit category. The category was new and I gambled that not many good painters were able to paint a complete unit in minimum unit strength.  I should be right and was awarded with a further Golden Demon trophy. Read the full story here.


Colour test for the Corsairs
Musician of the Corsairs
I remember painting a Corsair as a test miniature for my new colour scheme in December 2001. In the following I painted quickly two further miniatures before I had the courage to paint my first miniature from the command crew - the musician.

The latter was finished in the end of February 2002. Then I took a break from the corsairs and painted my Dark Elf General riding a Demon Creature. This miniature was planned as an entry for the monster category at the German Golden Demon competition in late summer of 2002. I decieded to paint a further entry and chose a corsair command group accompanied by a hero miniature as an entry for the Battle Squad category. The musician for that project was already done. 

The first small warband of my group of Corsairs


Limited Edition Malus Darkblade
In April 2002 I painted the Malus Darkblade miniature on foot for this group. This Limited Edition miniature was a Give Away during the Albion Roadshow and at this time point very rare. I remember paying 80 Euro for this guy which is still today a lot of money for a rare miniature. 3 year later I got the same miniature for free as an event miniature at the Gaming Day in Vienna in 2005... and with me hundreds of other people. Definitely, one of my worser investments into rare miniatures. However, at the timepoint of purchasing this little bastard I was more than proud to have one and wanted to decorate him with a worthy paintjob. This meant during that time spending him some extra greys. Therefore, he get a loincloth and a sash full of skulls. The idea was from a Undead Necromancer who had the skulls sculpted into the clothes. Here I added them by freehand. I put one bigger skull into the center which was my favorite Dark Elves skull design released as an icon coming with the Tears of Isha campaign. Various smaller skulls I painted around the center symbol. The sword als got some special effect. It was inspired by a further Undead miniature I found in the expanses of the internet, a vampire conversion which based on Aenur. His green sword remembered me on the greens of emeralds. A gem which fascinated me and which I often looked at in an geological exhibition in our institute where I studied chemistry at that time point. Today I am still very happy with this miniature and the challenges I mastered when painting him. The only thing which drives me totally crazy are his squinting eyes. The next time I will sit on the workbench I have to correct this or I go mad.

There is a bigger time gap in my memories and in my picture database between April and Juli. During that time I painted my stuff in parallel to my studies. Especially, during the exam period the brush rested for weeks and months. During the semester breaks I had to do some work to finance my studies. These periods were also busy but with more spare time to do some hobby. I remember I had some tough exams in my fourth year at university and I also remember working in the logistics in company which built housings for computers and electronic devices in the summer of 2002. This also fits togehter that I continued my work on this project in Juli 2002.   

6th Edition Corsair Standard Bearer
 

The standard bearer was finished in Juli. Beside of the banner he followed straight my colour scheme and is nothing special. The banners were very small in that miniature range so it was difficult to add a good recognizable central symbol. I decieded for a dragon design in some kind of tribal style which was a big thing in the early years of 2000. I painted the complete design and additional runes in white and glazed them with a lightning blue. This way the blues really poped out and the design is good recognizable on the dark background. The blue pearl on the standard top was painted the same way and shows nicely the quality of my blending skills at that early time point.

The Corsair Champion should have followed afterwards but my memories are vague for him. The deadline for the Golden Demon competition was always late August. The fact that I have no work in progress pictures and the first picture of him in my database is far after the Golden Demon event suggests he was finished just in time for the competition. However, somehow I finished everything and presented my two entries proudly at the Competition in 2002.

Unfortunately, I failed with both and drove home without a trophy. I was able to finish further miniatures of this regiment in the months after the event and finished this unit for my 6th Edition Dark Elves army. I painted for some further time in this style but I developed new skills in 2003 and my old stuff was more or less abandoned.


Two years later I gave this unit a second chance in the Golden Demon competition. 


The whole Corsair unit, free from dust and taken for new pictures in 2021
 
 
and was successful... partly due to some gambling. 
 
In 2004 the command unit category were gone and replaced by Warhammer Unit. The rules for the category state that a unit had to be the minimum size according to their armybook entry. That was in most cases 10 miniatures for infantry and 5 miniatures for cavalry. I suspect that the good and very good painters would not be able to paint so many miniatures in time for the event. Additionally, the most competition painters I knew had no interest in painting so many miniatures from the same type at all. I should be right and the new category had a bit lower quality level compared to single or monster. Therfore, I was able to win the second place and with that a silver demon for this two year old unit.


Looking at the regiment now I have to admit that it work much better as the rest of the army. 


The advantage here is that the unit comes with much more coloured areas and the proportion of light/dark areas is much more balanced. The Standard Bearer and his banner is still today a respectable work and the light blue colours are a very nice eyecatcher.

 
I still like the sword from my Malus Darkblade figure. Maybe today I would have added a shield with some freehand work which would make him much more an eyecatcher. But at the time I wanted to keep his expensive purchase in an original state. 


Today I would also add more global light and would get out more of the scaled cloaks and weapons. These three points are some major drawbacks looking at them now. However, the unit is still the strongest part of this ancient army project seen from the painting perspective. Finally, I am very happy that this unit and with it the whole army project got a trophy and was honored with a Golden Demon trophy.

I hope you enjoyed this trip down the Memory Lane. Return here to my Golden Demon Gallery or stay a bit and put your thoughts in the comments. So long, train your blendings and happy painting,
GeOrc

Tuesday, April 26, 2022

Lady Gibbons

Warhammer Witch Elf by Mark Gibbons

I will never forget the first time I opened the 4th Edition Dark Elves Armybook and was blown away from the fantastic art made by brilliant artists like Mark Gibbons, Des Hanley, Dave Gallagher and others. These artworks never bored me staring at them and I studied them for hours. With time moving on they served multiple times as inspiration for my miniature art. First I used them as reference for conversions and later as basis for designing whole miniatures. Still today I often use parts of them as reference for painting freehands. 

If there is one artwork which never let me go and which served as basis for multiple versions of its character it is the Witch Elf by Mark Gibbons. That angry lady has a surreal beauty which captivates you and let you be afraid the same time. Mark once wrote me that he is a magnet for dangerous women. I think we can be happy, that he shared his experiences in his art and that we can inspect that from a safe distance. This way his Ladies did not appear less intriguing to us. Once in my head Marks Witch Elf became my archtype for a Daughter of Khaine. Fascinated by this character, Lady Gibbons served as a reference for multiple projects through the ages. Today I want to share with you these sinister Ladies together with their story.


Three different versions of Marks iconic Witch Elf can be found in my cabinets


My first conversion

I started Warhammer Fantasy in January 1998 with my first Dark Elves army which I got as a birthday gift for my 19th birthday. It was an army from a poster deal which also contained three blisters of Witch Elves. I remember that these Wicht Elves were some of the first miniatures I painted. I used thick paint and painted all in different colours. Because a Champion for the regiment was missing I decieded to do my first conversion. Fascinated by Marks Witch Elf artwork I used thisone as reference and chose a miniature which was as close as possible to her character. I bended the miniature to capture the reference pose better. There was need to cut of her left arm and rearrange it completly new to get the pose right. The gap I filled with an air drying crafting clay. This was the first time using something like a putty. Because I had no tools I used a toothpick for sculpting. Her rigth arm had needed also a rearrangment but I feard this was to far from my skills. Therefore I kept it that way. The lower leg armour I created with thin cardboard I cut in shape and added tops of toothpicks as spikes. These were glued simply on the legs. Finally, there was need to create some weapons. I used needles for creating the parry blade which she raises high in her right hand. The shape of her sword was cut from her original blade. The basing was simple due to a lack of experience. Because of her pose there was need to position her rear leg on a stone

Witch Elf conversion created in 1999 in reference to Marks iconic Witch Elf artwork 
 
The conversion was finally painted to fit the rest of the unit. I used red tones as I liked these the most from all the colours I had tested. Additionally I added some freehands to get closer to the reference art. In this regard I tried to paint skulls on the lower leg armour and some line work on the upper top of her boots. A rune on her crest and some evil eye make up should underline her champion character. Even if the painting miss technical perfection, contrast and depth, the amount of details was very ambitious in these early hobby days. I still remember how proud I was of her. 
 
However, these early Witch Elves unit was hard to look at as time and my skills moved on. When I started to redo my 4th Edition army 20 years later the Witch Elves were one of the first units I sacrificed in a cauldron of aceton. All except of one. I spared Lady Gibbons. I shortly though if a complete revision of the conversion and a new painting would suit her. But I decieded against, because it would have destroyed the soul of the miniature and I am better doing one from scratch. Finally, she gets a lovely place in my cabinet and reminds me always where I came from and my first days in the hobby when everything was still new.


My first Green

As you have read above I started converting my miniatures very early in my hobby carrer. First using only simple techniques like changing parts, but I started quickly to do experiments with clay to perform some more complicated weapon and head swaps. The quality dramatically changed when I learned about Greenstuff. I can´t remember where I get my first stripes from but I remember well that I felt this will change everything. I started using it for simple conversions and ended more and more sculpting single parts of figures. First it was more some kind of resculpting what I had damaged during the conversion process. Then it became more and more sculpting my own details. Becoming better and with more experience I decieded to do some first experiments in the direction of sculpting my own figure. My first test in this direction was sculpting Tullaris from Har Ganeth by the fantastic art of Des Hanley. While I sculpted nearly the whole miniature I used a head and the weapon from existing Dark Elves miniatures because I feared my skills would not be sufficient for doing that by my own. Consequently, it wasn´t my first complete green, but it motivated me to do my first try in November 2001. I chose a further Artwork from the 4th Edition armybook and I took the one which impressed me most, Mark Gibbons Witch Elf!
 
Witch Elf Green from 2001
I started this ambitious project with creating an armature from with simple wire and put it on a cork as I have seen it from other sculptors. Then I started the sculpting process. My only tool was a toothpick and I used WD40 oil as a separating agent. The latter was a mess and the whole sculpt was always oily and looked like a fried chicken. I started at the bottom and sculpted a rough body shape and legs. Then I sculpted me slowely upwards in different sessions to geht the basic figure before adding tons of details. Luckily, I did a lot of pictures for documenting my project in my ancient forums and on my website. Therefore, I will provide a future article about the single steps of creating this green with all its oily details. Until then, you can see here my final result.
 
Final pictures of my Witch elf Green which I started sculpting in November/December 2001 
 
Retrospectively, I still think it was a respectable result for a first green. I am still happy with a lot of details, e.g. the leg armour and the sword. However, the whole figure miss some depth and is a bit to flat. The body anatomy isn´t that good as can be seen at the butt-leg transition, arms to thin and missing elbows. Finally and most important, her face isn´t that evil and pretty as I wished for her... it looks more like a plastic surgery fail of the mid 90s rewarded with nice pair of dinghy lips. Maybe I am a bit harsh with my self critic and I should keep in mind that it was my first try doing something like this. Additionally, I remember that the community liked it very very much. For most people in the hobby sculpting your own miniature was so far away that they totally go insane with compliments and feedback. That not enough I got a very nice feedback from a former friend and collector. His name was James Humphries from the US, owner of the website virtual alchemist and from whom I got my first rareties from. In the early 2000s he produced a series of limited edition miniatures for collectors. He wanted my Witch Elf for this series and so I sent it to the US where she got casted. 
 
Casting of the Witch Elves Green
Unfortunately, the project was canceled by the GW legal department after the first advertising. James sent me back the produced castings and the remainings of the green which was completly destroyed by the casting process. From these castings I built my version which I painted. The painting wasn´t very special and was in accordance with my late 5th Edition Dark Elves colour scheme. That means a lot of metals and beside some small spots of Hawk Turqoise and Liche Purple shaded with Nauseating Blue there was not much colour. I tried to cover the sculpting weekness especially in the face. Some aggressive eye make up helped to correct the eyes. I also added freehand details on the crest and on the boots. For the letter I am still very proud because these small skulls look very similiar to Marks brilliant reference. I think a modern painting could get out much more of the miniature. Especially using NMM could highlight all the beautiful details of the leg armour. Maybe one day I will give this girl a second try.    


Painted casting of my Witch Elf miniature. Painted in October 2002

Through the years I shared some castings with some friends and followers. I do not know where they all end, but it looks like some of these copies get some doubtful fame and had crazy stories. I know one ended on the Collecting Citadel Miniatures WIKI in the unreleased Dark Elves section where she is still listed as an unreleased trial sculpt?! I also heard one who was sold through the Yahoo Collecting Citadel Miniatures group for around $ 110?! It looks like time tends to produce some legends and I am happy that this lady at least get some attention. 


Lady Gibbons in the Age of Sigmar

Sometimes all you need for inspiration is a plastic bit. That is how this latest version of Lady Gibbons started to return again on my workbench. I was already warmed up as I had started a small Daughters of Khaine army a couple of months before. When thinking about a hero miniature and looking through the miniature range I noticed the big hair frome the Cauldron Slaugther Queen. The latter is nice remake of Aly Morrisons brilliant Cauldron Hag designed in the mid 90s. However, it was the first time I got the idea combining this bit with a regular Witch Elf and at once I had my favorite artwork from Mark in mind. Unfortunately, I had already built my Cauldron Slaughter Queen, which made it neccessary to buy a second kit. I experimented with a couple of bits and quickly had everything together to build a perfect interpretation of Marks beautiful artwork.   

For the body I used one of the cauldron guardians which had the perfect pose. The pose required some stairs and Morthis base was perfect. It only had to be optimised for the larger step length. A big sword I found in the sprue from the Dark Eldar Wyches. The most difficult part was to find the perfect face. Marks dark magic created an artwork in which the character of the Witch Elves is expressed only by this angry and insane looking face. I think all husbands know a milder version of this look when you had again forgot to take out the garbage. Can you feel the shiver? It was elemental to find an Elven face which enables making you feel this way. Consequently, I looked through all available ones and tested a dozen with potential. None was perfect but the best I could find and which made me shiver was one from the new Khinerai sprue.

Witch Elf conversion work in progress
It is important to note that my goal was not to rebuild exactly Marks artwork. Instead I wanted to create an interpretation which fits into the current Daughters of Khaine miniature range but would be as close to Marks artwork as possible. In this regard I used the common form language of the Daughters miniature range. For the leg armour I used designs from the Khinerai miniatures and the shoulder armours were designs from the Melusai. I also added the Parry Blade from the Cauldron Queen. Beside a slight difference in the leg pose I also decieded for a change in the arm pose as the original sword arm drawn by Mark looked very unnatural when recreated on a miniature. Consequently, I chose an arm position which was close to the original and fit to the pose of the conversion. 

While I had fantastic bits which covered most of Marks iconic Witch Elf there was still need for some sculpting work to link everything smoothly. The best way to get the Khinerai leg armour onto the boots of the Witch Elf was making small molds of the bits and to use it for stamping the armour parts with brownstuff on them. The hair I repaired with greenstuff just by following the preexisting lines of the original bit. There was also some work needed to repair the sword and dagger and to link both to the miniature. I added a small skull to the swordhandle but can´t remember I got that bit from.

The Witch Elf conversion taking shape and dominated my workbench in September 2018
 
Finally, there was need to fit the shoulder armour to the miniature. The original ones were all left sided, so I cut and resculpted one to fit for her right side. There was also need to adjust the arm position and to repair their connection to the body. Then I added some belts to connect the armour to the miniature. Because the original Cauldron Guardian is a bit flat-butted I added some greenstuff to get it in shape. Not that it was really necessary... but the artwork looked like Mark liked some curves. Unfortunately, I have no picture from the backside. But you will see it later painted and I think you will like it too.   
 
Working on the pauldrons and repairing the arm-body connections
 
I decieded to keep head and body seperated which would make it easier to paint that complex miniature. A quick comparison with the original drawing from Mark showed that my conversion catch right nicely the main features of the figure. I posted it on social media and the following feedback quickly confirmed that this project goes in the right direction. Mark also approved it and with his blessing it was time to paint her.

Comparison of the Witch Elf conversion with its reference
 
 
The conversion was primed and I started as usual with the skin colour. I quickly focused on the head, because I was very curious if I was able to catch Marks fantastic Witch Elf look. I stayed very close to my colour schemes which I had already establieshed with my Witch Aelves. I painted the hair by a mix of black and with strands which I highlighted or shaded with purple, respectively. The crown was painted in NMM gold with a red gem. Then it was time to start the details on the face. I added a dark smokey eye make up with some pink eyeshadow. The eyes itself were painted light brown and the lips get some natural redish lip tone. Overall I was very very happy with her face. She remembered me a bit on Charlize Theron and I liked that thought. The face was a bit different to Marks work but I think it sends her message very clear. 


I continued working on the body with smoothing the skin and adding shades to highlight her beautiful anatomy. For seperating the areas I added the basic colours for the gold areas and the red loincloth.


After I was happy with the skin I concentrated on the metals. I very much enjoyed painting the golden bra and the pauldrons. The latter get some nice reflections on their scaled centers. I also painted the arm armour. The challenge here was to create the cylindrical reflections on their small areas and to seperate the cold and silver areas properly. 


The next step included some first blendings on sword and parry blade as well as some detail work on the lower leg armour. The letter included some freehand gold edges on the knee armour. That was how I left here the day before me and my wife started our Honeymoon. When I came back I was infected with the idea to repaint my 4th Edition Dark Elves army. I painting an old Dark Elves Champion and started a project which would dominate my next years in the Hobby. After some lonely months without love on my workbench Lady Gibbons went in the cabinet on the shelve of shame.  
 
My painted Witch Elf conversin how I left her in the end of September 2018
 
From time to time I though about finishing her. But, there was still the big hurdle to finish the conversion of her base. My plan was to base her on Morthis base but her step lenght is larger than the step. It was necessary to convert the whole plastic bit of the base and I never got the motivation to do this. 
 
Witch Elf conversion in February 2021
However, I felt Lady Gibbons angry glance from my shelve of shame. Her evil stare became more and more threatening the more time has gone by. Therefore, she was my first choice to finish anything as an entry for The Miniatures Open Painting Competition. One day in February 2021 I grabed her base and get the job done. I painted the base in only one session and glued the body of the miniature on it. Then I finished the whole work on the body. I started finishing the leg armour and worked from bottom to top finishing one area after another. After the body was finished I glued the head on the body and filled the gap between both parts. There was only a bit of revision on the head and overall look necessary. Everything went so fast that I have no single picture of that phase. It ended all taking pictures of the finished miniature on February 21st. Here you can see this angry lady in all her weird glory. Isn´t she a lovely fury?


Additionally, here some different angles and a better view on the base which made me so much headache.
 
View on the base I used to step her downwards

I was very happy finishing her and to unleash her beauty in this Online Painting competition. The competition was a very very tough one and unfortunately she was not able to win a trophy. However, I am more than happy having her finished after all those years waiting on my shelve of shame. Maybe one day she will get a further chance in a competition, either alone or accompanied by her bloody Sisters.

I hope you enjoyed my journey through my collection of interpretations of Marks Masterpiece of a Witch Elf. I am sure now you believe me that this artwork is my most favorite one. I would love to see her starring from my walls. 
 
Therefore, Mark if you read this, if you ever think about to part with this angry lady, please keep me in mind!
 
Now I am at the end of this article. As always, please let me know what you think and write me in the comments.
 
Kind Regards,
GeOrc