Saturday, December 15, 2018

Tutorial for painting Freehands on Shields

Today something more technically. I made a lot of thoughts how to paint reproducibly symbols on my Dark Elves Shields. As I am not a great fan of Water Transfer Decals there was need paint my desired symbols with freehands. But, the main problem with everything handmade is that it is sensitive for faults and errors. Typically, the symbols can vary in position and size or worser in the design itself. The Dark Elves Army contains a lot of units carrying shields like e.g. Swordmen, Spearmen and the Cold One Knights. This makes it necessary to use a method, which allows you to paint the desired symbole with high reproducibility on your shields. Therefore, sheets with masks can be used. Here I show you how this will work:

1.) You need some masking tape as it is used for painting works. Put at least 3 layers or more of this tape on top of each other. Try to put them as accurate as possible on each other. Then use the tape to stick your desired symbol on top of it. There is need that the shape of your shield is contained in your design, either by the design itseld or painted around your symbol by yourself.
2.) Use some needles and mark the edges of your shield shape. The resulting holes serve later as position markers. Use a sharp knife and cut out the symbol.
3.) There is need that you also have markers in the design itself. Therefore I cut out the eye and nose holes as well. Try to work as accurat as possible, especially in the corners. Sometimes it is needed to cut by stinging. Try to hold your knife vertical to avoid to cut over a corner!
4.) Time to remove your template. You can see here the cut out I produced and used later. Carefully remove your tape layer. Avoid to pull on the tape because the tape can stretch and then distort your design. Use a spatula or something else to carefully remove your mask in one piece without damage. In a second step, remove the cut out the same way. You will need that too.
5.) Use some Patafix or Blu Tack to fix your prepared and coated shield on your working place. Then use the position holes as a guiding to fix your mask on your shield. Have in mind that in this case shown here the shield is slightly bigger, as my image didn´t take the round shape of it into account. Therefore, I had to middle it as best as I could, but the holes helped a lot. Work as accurat as possible here because the later centering depends on this step. Sometimes you have to try many time to get a perfect result. Then use your basic colours to paint the inlay. You can do this by brush or using an Airbrush. Both works fine but the latter works better as it doesn´t produce paint accumulations on the edges.
6.) Now use the inlay template to correct the position and add the details of your symbol. Therefore, put the inlay template centered on your painted symbol. Use the background colour to paint the rest of the shield. Then use the right colour to paint the details, here the eye and nose holes.
7. Here you can see the preliminary result after the transfer of your symbol on the shield. Now you have correctly positioned outlines and details which help you to create a proper freehand.
8.) In the next steps you need to sharpen and detail your symbol. Use the background and foreground colours to sharpen the edges of the symbol. Then add additional details which help you to proportion the different areas inside of the symbol. Here I added additional lines between the skull and horns, between the teeth and around the eye sockets. Additionally, I corrected the eye and nose holes. 
9.) Finally, you have to do the whole detail work. There is need to shade and highlight each area. I also highlighted the shield area in general. Because the basic shape of the shield is cylindric, the light distribution is a vertical light reflection in the middle. For additional detail work I added a gold edge around the shield and some scratches on the shield surface.


I hope this Tutorial helps you to create your own freehand shield designs. I did not go into detail in case of the detail work as the amount of detailing depends individually on the effort each one wants to put into his result. In my case I used a lot of blending techniques to achive the final result. As my Blending technique can not be discussed shortly this topic will be perhaps part of further Tutorials in the future. I hope you like this Tutorial. If you have questions, do not hesitate to ask me in the comments.
Kind Regards,
GeOrc

Friday, December 14, 2018

Executioners - Part II

Initial thoughts
After I had finished the preperations on my executioners unit I can´t resist to paint the first miniature of this unit. Therefore, today I want to write down my experiences with these miniatures. In preperation for the paint job I made a lot of thoughts which colour scheme I should use. I liked the original colour scheme from GW very much, showing them in purple. But this was different to my initial idea for this army, seperating it in a basic part coloured in purple and a Temple of Khaine addicted part coloured in red. Consequently, I thought about red coloured hoddies and cloths fitting to the colour scheme of the witch elves. I stumbled on the beautifully executioner unit from Iain Aitken, who painted an awesome 4th Edition Dark Elves Army. Please check Iains Facebook site and take a look on Iains Miniature Art.

Executioner Unit by Iain Aitken


 Iain painted the hoddies red, exactly as I had it planned. His result is stunning, but resulted in a much lighter colour as I had it in my mind. I wanted somethind dark and sinister in its appearance. However, I wanted to avoid black hoddies, as I wanted the hair and the axe shafts in black, ending in a to dark area on the upper side of the miniature. I already made this fault, when painting the first executioners 18 years ago. Finially, the GW colour sheme wasn´t that bad and I gave it a go. Beside the purple for all cloth parts I really liked the golden bracers in this colour scheme.    


The Way of Painting
As always I started with the skin colour based on Bleached Bone with some glazes of warlock purple to add some warmth. Then I started my work on the purple clothes. For my basic colour I used Liche Purple. For the highlights I mixed Liche Purple and Bleached Bone in different variations. For shading I used a mix of Abbadon Black with a bit of Incubi Darkness. I painted the light distribution strict by zenital light rules which resulted in very nice coloured purple hoddy. Finally I added some glazes with Warlock Purple to add some more saturation to the purple. In a next step I painted the black parts consisting of hair, axe shaft, shoes and some smaller parts of his loin decoration. Then I added the gold and the red gems. I used some brownish silver NMM for the chainmail and headdress and a bluish silver NMM for his axe. The last step included the leather, based on Tallarn Flesh, shaded with Scorched Brown and black and Highlighted with Bleached Bone. The Leather was washed with Liche Purple to merge it into the purple colour scheme and some scratched were added for a used look. The base was painted similiar to the others reflecting some High Elves ruins.


I was very pleased how the Executioner turned out. The purple hoddie added some colour and therefore much more character as a black one could add. In contrast to red clothes the purple helped to get the miniature a darker and sinister look. He fits very good between the other miniatures of his gang. He is not that light compared to the with Elves and in my opinion slightly darker than the Champion. The latters appears more shiny as he carries a lot more bling bling with him as reasonable when calling yourself a champion.

Dark Elves Warband

How you think about the colour scheme and how it works compared to the rest of my current Dark Elves warband. Let me know in the comments.
Kind Regards,
GeOrc

Tuesday, November 27, 2018

Executioners

The first time I came across the unreleased executioners was when studying the Beastiary of the 5th Warhammer Fantasy Edition.

Dark Elves Army as shown in the 5. Edition Bestiary

 
Dark Elves Battle Force
I quickly realized a second pictures showing these miniatures as part of a small Dark Elves battleforce charging some Dwarfs in a Scenario example. I never forget my call at Mail Order UK trying to order these miniatures as well as some other miniatures featured in the armybook but without a counterpart in the shops. My disappointment was boundless when realizing that these miniatures were never released. I got some more snippets of information about the executiones when I came across Richard "Orclord" Hales Stuff of Legends Website. Surprisingly, the Executioniers had a release, even if this was a short one. You were able to get them on the US Games Day in 1999 together with the unreleased Warhydra. Well, I thought then I keep my eyes and ears open and try to get them when the time is right. In the meantime I got the chance to get a look on the Executioners, the hydra as well as on the unreleased Sorcerer in real life. In  autumn 2000 I joined Harald and Natalie Bussing to the DUZI Event, where Harald led his impressive Dark Elves Army in a 4000 points tournament battle. He showed the best of their Dark Elves collection, which also includes a unit of Executioners lovely painted by Jennifer Haley. Additionally, the unit includes a beautifully converted command group from her consisting of a Champion, a musician and a standard bearer.

   
Executioner unit from the collection of Harald & Natalie Bussing, painted by Jennifer Haley


Shortly after this event I found an offer on Bartertown, a trading site where it was also possible to get hard to find Tabletop miniatures. The offer was about 40 executioners and 1 warhydra. The guy prefered to sell the whole bunch of miniatures with some discount or splitted in two equal batches.

However it was hell of a lot of money, that´s because the offer was still available. I get that deal and my girlfriend of that time nearly killed me. I thought to take them all and to refinance the deal later by selling some of the minis. In the end that never happend. My army was 40 Executioners richer and I was poor but more than happy!


The miniatures

There exist eight different executioner miniatures. As common for that time two miniatures base on one identical basic armature. Two basic poses exist with axe holded vertical or hold diagonal in front. The axe blades vary by a round or square blade design. Characteristic for the miniatures are their hoddies which were more or less decorated and their corded bracers. The minatures also carry a lot of bags and very detailed front decoration.

Executioners as shown on the SOL website
 
I painted a bunch of these miniatures in the past for my 5th Edition army. For the painting I decided for a mix of the dark painting scheme from Jennifer Haley as well as the Games Workshop colour scheme. Additionally, I converted my Champion the same way Jennifer Haley did.

Executioners painted in 00/01


It is a nice looking unit, but the paint job did not highlight all the beautiful details, these miniatures have. As I started to rework through my 4th/5th Edition Dark Elves I also decided to paint a unit of Executioners, because I am very interested in seeing how the unit will look when painted with my skills from today. Therefore, I started the preparations to get a unit ready for painting. Here you can see this unit containing one copy of each available Executioner. The unit was reinforced by a generic command crew consisting of a musician and a standard bearer. All miniatures were prepared very qualitatively to remove properly all mold lines. Then I have based them on a temple ruin scenery underlining they temple affiliation. The central Executioner with the biggest blade was again used to display the Champion of the unit. His base was designed in a way that it is interchangable with the already painted Dark Elves Champion which should alow to lead this unit alternatively. However, I would love to rebuild the Jennifer Haley Command Crew but also to sculpt my very own from scratch. But these will be different projects.

New Executioner unit ready for painting 2018
  

Here they go. I can´t wait to see them painted. Stay tuned
Kind Regards,
GeOrc


Sunday, November 11, 2018

The Witch Elf Champion


Today I want to talk about a very special Witch Elf, the plastic miniature of the Talisman City of Adventure Expansion.  This miniature was very often used as a Champion model in various Dark Elves related Games Workshop publications. You can see it in the Dark Elves Armybook as well as in the 5th Edition Beastiary often as a centerpiece in the front row of the Witch Elves unit. Was a metal miniature for a Witch Elf Champion missing? Propably no.
There exists a metal Witch Elf standing out from the Witch Elves miniature range. The miniature sculptured by Aly Morrison was much more detailed and decorated with a lot of juwelry compared to the other other Witch Elf miniatures. It shows a Khorne rune on her headdress, skulls on her boots and a lot of jewelry in her hair. While, always two Witch Elves were produced from one identical basis, limiting the eight Witch Elves to four armatures, this miniature has no twin. Finally, for most Dark Elves units a maximum of eight metal miniatures were produced, suggesting that this ninth outstanding Witch Elf was planned as a Champion model. However, this Witch Elf was often banned to the second row, replaced by the plastic Talisman Witch Elf. What made this miniature so special?

The Witch Elf Miniature
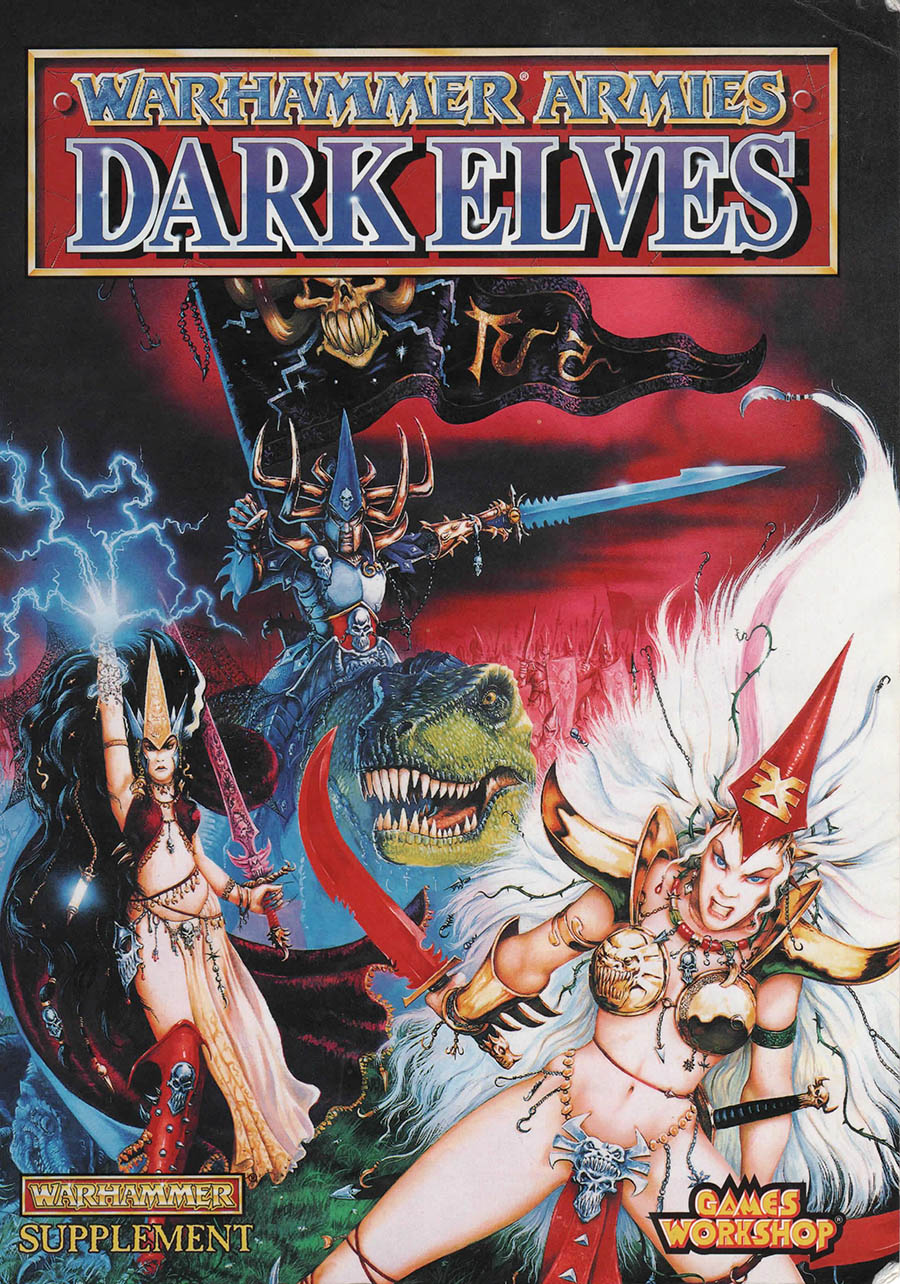
The Talisman Witch Elf based on the artwork of David Gallagher which decorated the Dark Elves Armybook of the 4th Edition. In a direct comparison you can see that a lot of the details were adopted for this miniature as the pose varied a bit. The identical details include her face expression, the metal bikini, the shoulder armor design, the headdress with the Khorne symbol, the swords but as well as tiny details like her necklace. The pose was propably varied for two resons. While the artwork pose with outstretched arms requires a lot of space the later miniature pose with one sword over her head is more compact, fitting better on a 20 mm base. Additionally, the arms in the artwork were streched also in the backside direction, which was difficult to reproduce in a miniature this time, because the metal casting favours more planar poses. Taken together, the change in the pose was probably related to the production process. While the pose was probably a limiting factor, it is surprising how much detail this early plastic miniatures possess. Really outstanding are her necklace and the hilt decoration which are nearly identical reproductions of the artwork. Her face, head and tiara is so much detailed, making it hard to understand every detail. To see the 3up version used for the CAD translation would be a real pleasure and would allow to see this ministure as it was planned by the designer. After talking a lot about the good features of the miniature, it contains also a lot of weakness. In general the proportions of the miniature are to broad. This is true for her head, arms, legs and affects the whole vertical dimension. Consequently, the miniature appears to short and broad. I remember a friend always talking about the Pancake-headed Witch because her beautiful face suffered from the circular streched head. A further design fault in my eyes are the missing straps of her metal bra. I had no clue what was the idea of the designer to drop a proper fixation for her two shells. The crippeled underside of her bracelet in contrast to the artwork design looks for me as a problem with the mold or the casting process of this detail as I have seen painted miniatures without that error. A further feature I dislike are the ribbons on her sides and on the backside. These have no match with the artwork and miss the filigree form of the comparable details as the ribbons used as a loincloth. Again a look on the 3up sculpt or an information of the designer would be very welcome.

Some Games Workshop Dark Elves History
While the metal Witch Elves of the 4th/5th Edition Dark Elves were all designed by Aly Morisson, the Talisman plastic With Elf did not look like Alys work. So far I was not able to identify the sculpturer of this miniature. The Talisman City of Adventure Expansion was produced in 1994 and the box set was announced in White Dwarf 179 from November 1994. This date is about half a year previous to the 4th Edition Dark Elves release teasered in White Dwarf 186 in June 1995 and starting fully with White Dwarf 187 from July 1995.


It is curious that the advertisment for the Talisman box set shows a miniature looking like a metal witch elf from the 3rd Edition Dark Elves range. The same picture was used on the backside of the the box which was also mentioned in this article for a lot of other figures. These miniatrues probably display the miniatures used in the playtesting indicating that the production of the plastic Witch Elf figure was finished after these shots were made but perhaps just in time before release of the box. The White Dwarf article also mentioned a Dark Elf Warrior which was playtested but finally dropped and did not make it into the box. The White Dwarf article shows the character card using also a 3rd Edition Dark Elf Warrior. It was mentioned in this side note, that the plastic Dark Elf Warrior of the 4th Edition release was a dropped Talisman miniature. Curiously, the design is also found in the background of the cover artwork from David Gallagher. I also want to mention here  We know from the Reddit Interview with Mark Gibbons that "Usually the miniatures were already sculpted but there were plenty of occasions where the illustrations served as concept art for the sculpts". Therefore, it would be interesting to know in this case if the Talisman Witch Elf and the Dark Elf Warrior were the first miniatures of the 4th edition, serving for David Gallaghers Artwork or vice versa. If you have any information about these early days of 4th Edition Dark Elves History let me know in the comments!   

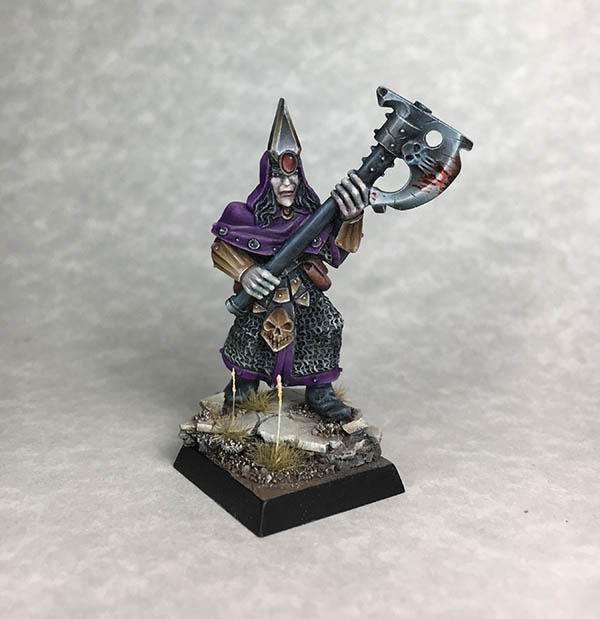
Painting the plastic Witch Elf

After I finished my first test minature of the Witch Elves unit one week ago I can not resist to lay my hands on this miniature. Knowing already in advance that this will become a real challenge to make her look fitting between the metal miniatures. I used the test miniature as well as David Gallaghers cover artwork as reference. I started with my usually used pale skin tone. There was need to do a lot of shading on the sides to reduce her volumes and giver her a slinker and more streched look. I also used freehand techniques to add some more details to the skin, so that she get as detailed as her metal sisters.


I painted her bra with a spherical reflection effect which helps to put this detail into the focus. The hair was a pain in the arse as it is a very rough sculpt compared to the metal miniatures. There my typical shading using lazes did not work here and I was used to use a lot of mixed colours to get the blendings properly done. I used again the blue glazes to add more effect on her blades. Because these were smaller compared to the metal Witch Elves I avoided to much scratches and blood effect which I used normaly to cover the clumsy weapons. I hope you like the final result. Let me know what you think in the comments.
Kind Regards,
GeOrc


Sunday, November 4, 2018

The Oldhammer experience


2 weeks ago I posted my Oldhammer Dark Elves Champion from 4th/5th Edition and well.... the reactions and feedback for this miniature blow me totaly away. More than 260 likes in the Oldhammer FB Community and more than 1700 likes on Instagram.

Additionally, a lot of very friendly and positive comments, how much they love this miniature and its paintjob. It seems that  still a lot of veterans exist out there, still in love with the Dark Elves of this age. All these positive reactions have motivated me to dig deeper in the past and in the early days of my hobby career.

Today I want to tell from the story how I decieded for the dark elves. I was still in school but already infected by the Games Workshop virus. Some classmates mentioned my new interest and gave me the hint that there are other players at our school. After I get connected to them, I get the Beastiary and the Rulebook of the 5th edition from them. I do not know how much time I spent, reading on these pages and looking at the armies and miniatures in these books, but it was a lot. My view stared on thes epages and I studied the armies, thinking about which one I wish to collect. Quickly, two armies get in my focus, dominating by their impressive dragons. The Chaos army with Egrimm van Horstmann on his Two headed Chaos Dragon Baudros in its centre and the Dark Elves army using Rakarth, Beastlord of Kharond Kar on his Black Dragon Bracchus as a center piece. While I really loved the Egrimm miniature, the beginner in me feeled the majority of the Chaos force very disturbing, especially the Chaos Demons. Checking the Dark Elves army I an impressive dragon, cavalery riding raptors and half naked girls with big swords.

  This army really was different compared to all others and the decision was made. In the end its was the With Elves and the Cold One Riders which favored this decision and that is why I want to deal with both units in my next paint jobs.


Being a gentleman and so I let the women go first! I already prepared a unit of Witch Elves in the weeks past. The unit consist of all 9 available miniatures of the 4th/5th Edition. Additionally, I added the plastic Witch Elves Champion which was officially realeased in the City Expension of Talisman Board Game.


I know how frustrated I was back in 1999, when calling the mail order in UK trying to order this Champion only to get informed that this miniatures and many others were not available. Luckily, the Talismann plastic miniatures were released years later again and I made sure to get the champion as well as the plastic sorceress which was from an other talismann expansion. All ten Witch Elves were situated in a temple ruin environemt. This reflects the setup from the Beastary picture. I always loved the idea how these religious fanatics stray through the temples of other races to capture and sacrifice their victims on the altars of Khaine. In my opinion, a High Elves surrounding suits best, as the eternal battle between both races is one of the most epic ones in the Warhammer World.

I painted a first test miniature to get an idea if the colours work. As my Dark Elves Champion prototyp combines purple and red colours with a focus on purple, I decided to focus on red colours for these Khaine related troops. 


In contrast, the details were painted in purple. For the hair colours I used the classic light white colour scheme supplemented with glazes of magenta, purple and blue. For this first psycho lady I used the magenta variant, which worked fine with her massive hair. While most of the miniature is very filigree, the weapons and the typical Dark Elves headdress were a bit clumsy. For the headdress I added a gold lining around the triangle to get a higher degree of detail. For the swords I used complex reflections, battle damage and blood spatter to maximize the degree of detail. Unfortunately, the swords still look very oversized. Anyway, I like this girl and I am curious how the other Withc Elves will look using this colour scheme.
I hope you like it.
Kind Regards,
GeOrc


Saturday, October 27, 2018


Oldhammer


I painted this little evil fellow for introducing myself to the Oldhammer community on Facebook. I have been collecting and painting citadel miniatures for over 20 years now. I started 1998 in the 5. Edition with my first Dark Elves army. The love for these evil pointy eared bastards accompanied me since then and I collected miniature through most editions. Recently, I came across Orlyggs Blog: Realm ofChaos 80 and my interest in the old miniatures ignited again. I used the nostalgic feeling, took this old dark elves champion out of the box and enjoyed to gives this little guy a paint job with all the skills I gained through the last years. I had a lot of fun with this guy and I was surprised about the degree of detail you can get out of these old sculpts. 

I decieded to painted the miniature in purple/ red colour scheme. In contrast to the Eavy Metal paint job I painted the skull applications and shoulder armor in gold instead of in bone colour. The NMM helped to increase the depth of detail. I used brownish glazes in the armour and bluish glazes in the sword.


The backside of the cloak was painted in purple with some freehand work on it. I used the 4. Edition army book for inspiration. There I finde some nice line work and a skull which I combined to create the final design. I did a small scetch to realize the final look and painted the whole thing on the cloak. For this I started with draft using Screaming Skull which helps me to lighten the background. The draft is then coloured using the NMM colours. I dislike that the NMM turned out a bit more satturated compared to rest of the NMM. This is propably related the differences in the undercoat. Here a final picture of a slightly different angle: 


Finaly, you can see here the Champion against his old cousin painted around the year 2000 and the improvment in my painting skills during the last years:


Now I am curious how some other old miniatures would look when painted again after 20 years. I would enjoy to complete my collection this way and also to explore the older 3. Edition miniatures. 
Kind Regards,
GeOrc 


Friday, October 26, 2018

20 years of Warhammer

Hi all,
this year I celebrate my 20th Warhammer Birthday. Everything started in january 1998 with my first 4./5. Edition Dark Elves army from a Games Workshop Poster Deal. The Army was a gift from my family and with these evil fellows my hobby career started and my love for the pointy eard buggers was paved.


I collected an imense army and painted a lot of the miniature range of this time. It ended when the 6. Edition Dark Elves were released in June 2001. The new miniature range designed in majority from Chris Fitzpatrick and Juan Diaz just blow me away. I collected this miniature range until 2008. It was my Golden Age, a Dark Elves army well known and spiked with a bunch of Golden Demon Trophies. The years after were marked by real life and the hobby was never the same again. The Dark Gods kept an eye on me and the Changer of Ways turned my interest in a new direction. However, the chaotic years find their end in the End Times.

With my 20th Warhammer anniversary my focus turned again to my beloved Dark Elves. My initial idea was to restore my 6. Edition Army. But, the announcment of the new Daughters of Khaine get me excited and I thought giving Age of Sigmar and the new miniature range a try. I had a lot of fun painting my first Witch Elves and base them on round bases. My motivation is back and I am looking forward to paint more of the new evil girls. Even if my first attemps were not succesful at the Golden Demon Competition this year, I think the first troops will do fine in my showcase.

Additionally, I find the time to restore some of my older 6. Edition Miniatures and I also get interessted again in the older editions. I decieded to celebrate my anniversary together with my Dark Elves through all ages. I thought about publishing my efforts and thoughts about twenty years of warhammer. Thats why I dig out my lost and damned Blog. I will give it a new try and hope this attempt will be more sucessful than my last.

Kind Regards,
GeOrc