Monday, January 28, 2019


Some Cold One Knights history

A unit of Cold One Knights chasing some bretonian spearmen
The last weeks I busied myself a lot with the Cold One Kinghts of the past. I studied the Games Workshop studio army of the 4th Edition release and tried to get an idea how they built their Knights and how this fits into the history of the Dark Elves army release. I get several insights I want to share and discuss with you.

Back in the days of the 3rd Edition of Warhammer Fantasy Battle the Cold Ones walked on all four legs. This changed with the release of the 4th Edition Dark Elves to a more Raptor like appearance. This appearance was used by John Blanches artwork in the 4th Edition armybook which can be seen as one of the first concepts pawing the way for upcoming release. Also David Gallagher used a two leged variant when creating his Armybook cover in 1995. In contrast, some of the black and white art from Mark Gibbons of this armybook still used the four leged variant of the past. These artworks were updated with new raptor like art when releasing the tears of Isha Campain in 1999.
The models designed by Trish Carden were two leged raptors, which were liked a lot in the community. Consequently, the Cold One Knights become one of the most iconic units of this release. In addition the unit gets an impressive Command Crew and their release was supported by own tactical article written by Jervis Johnson in the White Dwarf #188. A General miniature mounted on a heavily armoured Cold One followed a month later. These models were some of the best of their age and used far into the 6th Edition. A lot of people in the hobby prefered the dynamic reptiles rather than the new, bulky, and cow like Cold Ones of the year 2001.

The release schedule


The history of the Cold One Knight release was a chaotic and a sad story and therefore was in line with the whole release of the Dark Elves in 1995. The White Dwarf #187 presented the second wave of Dark Elves and the first appearance of the Knights. Consequently, it also contained some Mail Order pages showing the released miniatures and their parts and bits. In this first reference the release included a standing and running Cold One body variant as well as four head and tail bits. The riders based on only one leg part which can be combined with two different torso and lance variants. The third wave of Dark Elves miniatures one month later included a single Cold One Knight in a blister. The Mail Order pages again presented the Cold One Knight parts and bits but with a different compilation missing one of the lance variants.
Another month later the Command miniatures of the Cold One Knights were released. The command crew included a Standard Bearer as well as a sword wilding Champion. The Mail Order page of the Cold One knights was updated with the new bits of the command figures including a new leg variant. This leg variant based on the existing leg bit but with additional repeating crossbow, bags and baggins. The missing lance did not appear again. Later, they stopped also the production for Head #3 and Tail #1 and both bits become very rare. In contrast to the lance, the head and tail bits appeard for some time in the Mail Order Flyers and Citadel Cataloges until they disappeared with the Citadel catalogue from 1998. 


                       A                                                            B

                       C                                                            D
                       Mail Order pages from White Dwarf #187 (A) White Dwarf #188 (B) and from White
                             Dwarf #189 as well as from the 1998 Citadel Catalogue (D)


The studio army

The first Knight as shown in the Dark Elves Armybook
With creation of the Dark Elves Armybook only one Cold One Knight was painted and ready to be shown on the Eavy Metal pages. In additon, the last page of the Armybook showed a picture containing everything painted before printing of the book. This picture also showed the three Cold One Knights representing the three miniatures representing the box art of the Cold One Knight box. Therefore, it looks like the Cold One Knights were finished late in the released schedule with a focus on finishing the three Cold Ones Knights needed for the box art. The box was finished as the Dark Elves Army release get its official presentation with the White Dwarf #187. It contains the necessary parts to build three miniatures and in addition some self adhesion banners for the lances and transfer slides for the shields. While lance #1 was part of one rider of the box art, the head #3 and tail #1 were not used in the builts of the first three knights. To my knowledge lance #1, Head #3 and tail #1 were dropped early and did not appear in the box. Therefore, their bits disappeard quickly after the upcoming production molds focused on the box content.


However, these bits appeared in an other of the early knights of the studio army. The so called "rare Knight" based on the standing Cold One variant with head #3 and tail #1. The rider also uses lance #1. This rider completes the early Cold One Knights using both body variants two times and used all four head and tail variants in mixture. Take a closer look at the studio builts, they initially used the dynamic tails for the running body variants and the static tails for the standing body variant. Same is true for the lance. Lance #1 has a pointing arm position and lance #2 has a bended arm position ready for impact. Consequently, the standing Cold Ones used lance #1 while the running variants use lance #2. The painting of the Cold Ones showed different shades of green. The Box art already featured a light green variant, a darker green variant and a bluish variant. The "rare Knight" used the same dark green variant as one of the Box Art Knigths. The Knights itself mixed purple and blue colours on their clothes as well as on their lance banners. The skull and the teared heart symbol were used alternately on banners and shields.  


Different pictures showing the "rare Knight"

With the release of the Command figures with the White Dwarf #189 the Dark Elf Cold One Knights get their Eavy Metal page. In addion, the already mentioned article about Cold One Knights tactics from Jervis Johnson was released. Therefore, a lot of pictures feature the Knights in all their glory. A closer look on the Command miniatures showed that again their built and paiting was very well planned. The Champion used the running Cold One variant again with a dynamic tail. In contrast the Stadard bearer used the standing variant used the rare tail #1. Both builds used the most impressive Cold One head which is a bit bigger in size compared to the other three variants. Unfortunately, both Command builts did not use the newly released leg part. 
The painting underlined their command status. Both Cold Ones were painted in bluish colours, giving these reptiles an older and  more veteran appearance. The elite position of the Command Crew was refelcted by adding more golden armour parts as well as some unique shield designs. Here, the Champions used again the skull motive with additional red horns and the Standard Bearer used a small shield with runes.   


Eavy Metal page of the Dakr Elf Cold One Knights

Beside the new Command miniatures two other Cold One Knighs pop up. These Knights strengthen the studio army to six Knights allowing to put a unit of eight Knights on the tabletop when using the command crew as well. In contrast to the well planned early Knights of the studio these late Knights were a bit different in their built and painting. One of the late Knights Cold One built was a copy of the bluish box art Cold One. This time it was painted in green with bluish scales. The other new Knights Cold One built was a copy of the light green box art variant but using a dynamic tail. Both Knight builts use the new leg bit for the rider with additional bags and a repeating crossbow.  


The flank shows the late Knights which appeard together with the command crew

In summary it seems that the Cold One Knights-release used a list of varing parts and bits which evolved during the release schedule. Some parts were dopped and some other appeared later. In conclusion, the studio army showed more variance as most of the players were able to put on their table in the mid 90s. When I started collecting this army in 1998, a lot of the bits had already disappeared. I learned later that collecting all these parts can be quite hard. As I was able to get head #3 and tail #1 after searching through thousands of Ebay and Facebook auctions I still miss a sign of lance #1. I don't now if this bit was ever released as it disappeared already one month after its release. If you have ever seen this lance I would be happy if you could drop me a message in the comments.

That is the story about the Cold One Knights so far. The next article will show how I try to rebuilt these impressive Knights of the past.

Kind Regards,
GeOrc

Thursday, January 3, 2019

Cold One Knight Champion

Dark Elves Cold One Knight Champion
As mentioned in some other articles on this site, the Cold One Knights have a special place in my heart. As a child I was very interessted in dinousaurs and all these extincted lizards. Only six years old I was able to tell you everything I have heard about this topic in hour lasting explanations. Growing up, all variations of dragons and of course Godzilla were the next on my list of special interest. As a youth I kept some pythons, a boa and a iguana and still today snake venoms are part of my scientific work. Since these early days the fascination for reptiles in their various forms accompanied me through my life. When starting to read fantasy books the dragon lance books with all their stories about dragons and draconians were my first ones closely followed by the books aroud Drizzt Do´Urden. The latter fascinated me and I loved this strange Dark Elves with their matriarchy society, their skilled fighters and of course their lizard riding Dark Elf nobles. No wonder that the Warhammer Dark Elves setting which was similiar in all these details fell on fertile ground.    

Some hobby history
Back in 1998 the Cold One Knights were part of my first Poster Deal army. I am having the day in my mind when I opened the blisters and started the building of these awesome miniatures. After I painted my first Spearman test miniature I can´t wait to get my Cold One Knights done. Therefore the Cold One Knight Champion was the second miniature I painted in my Warhammer hobby time.


Comparison of my Champions from 1998 and 2018


I converted the miniature a bit by addig chains as reins and tried something different than the classic green painted base design. The paint job was simple and based on a dark colour scheme with some red details. 20 years ago I was very proud on this miniature. During my early years I painted a lot of these Cold One knighs and was able to put a very big unit on the Tabletop.

The miniature
20 years later these miniature are still some of my favorites. Again the Cold One Knight Champion was a miniature of first choice when deciding to repaint my 4th Edition Dark Elves Army. When looking through my left overs from these time I found a full Cold One Knight unit in one of the boxes. I bought them second hand shortly before the change to the 6th Edition and they never get painted. Happily, I startet to clean and prepared them properly. I quickly mentioned that using Milliput as a gap filler is a big advantage today. I wished I would have known that 20 year earlier. That would have saved me a lot of headache and frustration. I decided to move on with my High Elves ruins for the base and tried to display parts of a street with debris. I used bit from the High Elves Sorcerer sprue as basis, made a simply mold and casted the bit with gypsium.

View on the base as well as on eyecatchers: Sword and Shield


Painting the Cold One 
I started with painting the Cold One. I looked through a lot of references how other painters painted these or later versions. I stumpled over the exceptional work from Stefan Rath, paiting a Cold One Rider as part of his Dark Elves tower diorama. His miniature combines olive greens, blues and dark greens in a subtle way without looking to colourful. Additionally, he used light colours for the belly and legs while using darker tones for the scales on the back. With this reference in mind I started to paint my own. I used Ogryn Camo and desaturated it additionally by adding Administratum Grey. This mix serverd me as a basic colour. I shaded by adding black containing a bit of Incubi Darkness. The Highlights were done using Bleached Bone which can be mixed nowadays by a 1:1 mixture of Ushabti Bone and Screaming Skull containing a tiny bit of Golden Yellow. The scales were painted in Incubi Darkness. Each scale was highighted to the bottom with thinned Bleached Bone and shaded to the top using thinned Black. This reversed light to dark transition is characteristic for reflecting materials like gems, metal and shiny scales. The resulting light effect works fine and underlines the reptilian look and character of the miniature. 


Painting the Cold One Knight
The colour scheme of the Knight is a continuation of the scheme from the Champion on foot miniature. It uses purple as an army colour and red for smaller details. Two eyecatchers on the miniature are the sword and the shield. The sword was painted in NMM chosing reflections which work on its complex shape. Designs with an odd number of surfaces are always complicated. Normally you always try to paint neighboring areas with an opposite brightness. This works always fine for qual numbers of areas. Odd numbers of ares often require double transitions which has to be painted freehand. However, as I planned to do multiple tranistions in one area anyway it was only necessary to change the lenghts to get a good looking result. Anyone noticed that this sword looks like a Super-Stardestroyer from Star Wars? The shield was discussed in detail in my last article, so nothing more to say about it additionally.

Thoughts about the Cold One Knight Unit


I really like the final result and he looks very much like a Champion. Now its time to paint more Cold One Knights and to think about how the final unit should look like. I like the Eavy Metal Team idea to paint the Cold Ones in different green and blue tones. As espacially the Champion and the General have dark bluish Cold Ones it looks like their skin and scale tone shifts with increasing age. I really like that idea, but that means my Champion is riding the wrong Cold One. Now I will plan the whole unit, will plan a combination of fitting bases and put together a unit of Knights and their Leaders fitting together.

Cold One Knights Work in Progress


But this will be the story of an other article.
I hope you enjoyed this article. Let me know what you think about the Dark Elves Cold One Knights of the past in the comments.
Kind Regards,
GeOrc


Saturday, December 15, 2018

Tutorial for painting Freehands on Shields

Today something more technically. I made a lot of thoughts how to paint reproducibly symbols on my Dark Elves Shields. As I am not a great fan of Water Transfer Decals there was need paint my desired symbols with freehands. But, the main problem with everything handmade is that it is sensitive for faults and errors. Typically, the symbols can vary in position and size or worser in the design itself. The Dark Elves Army contains a lot of units carrying shields like e.g. Swordmen, Spearmen and the Cold One Knights. This makes it necessary to use a method, which allows you to paint the desired symbole with high reproducibility on your shields. Therefore, sheets with masks can be used. Here I show you how this will work:

1.) You need some masking tape as it is used for painting works. Put at least 3 layers or more of this tape on top of each other. Try to put them as accurate as possible on each other. Then use the tape to stick your desired symbol on top of it. There is need that the shape of your shield is contained in your design, either by the design itseld or painted around your symbol by yourself.
2.) Use some needles and mark the edges of your shield shape. The resulting holes serve later as position markers. Use a sharp knife and cut out the symbol.
3.) There is need that you also have markers in the design itself. Therefore I cut out the eye and nose holes as well. Try to work as accurat as possible, especially in the corners. Sometimes it is needed to cut by stinging. Try to hold your knife vertical to avoid to cut over a corner!
4.) Time to remove your template. You can see here the cut out I produced and used later. Carefully remove your tape layer. Avoid to pull on the tape because the tape can stretch and then distort your design. Use a spatula or something else to carefully remove your mask in one piece without damage. In a second step, remove the cut out the same way. You will need that too.
5.) Use some Patafix or Blu Tack to fix your prepared and coated shield on your working place. Then use the position holes as a guiding to fix your mask on your shield. Have in mind that in this case shown here the shield is slightly bigger, as my image didn´t take the round shape of it into account. Therefore, I had to middle it as best as I could, but the holes helped a lot. Work as accurat as possible here because the later centering depends on this step. Sometimes you have to try many time to get a perfect result. Then use your basic colours to paint the inlay. You can do this by brush or using an Airbrush. Both works fine but the latter works better as it doesn´t produce paint accumulations on the edges.
6.) Now use the inlay template to correct the position and add the details of your symbol. Therefore, put the inlay template centered on your painted symbol. Use the background colour to paint the rest of the shield. Then use the right colour to paint the details, here the eye and nose holes.
7. Here you can see the preliminary result after the transfer of your symbol on the shield. Now you have correctly positioned outlines and details which help you to create a proper freehand.
8.) In the next steps you need to sharpen and detail your symbol. Use the background and foreground colours to sharpen the edges of the symbol. Then add additional details which help you to proportion the different areas inside of the symbol. Here I added additional lines between the skull and horns, between the teeth and around the eye sockets. Additionally, I corrected the eye and nose holes. 
9.) Finally, you have to do the whole detail work. There is need to shade and highlight each area. I also highlighted the shield area in general. Because the basic shape of the shield is cylindric, the light distribution is a vertical light reflection in the middle. For additional detail work I added a gold edge around the shield and some scratches on the shield surface.


I hope this Tutorial helps you to create your own freehand shield designs. I did not go into detail in case of the detail work as the amount of detailing depends individually on the effort each one wants to put into his result. In my case I used a lot of blending techniques to achive the final result. As my Blending technique can not be discussed shortly this topic will be perhaps part of further Tutorials in the future. I hope you like this Tutorial. If you have questions, do not hesitate to ask me in the comments.
Kind Regards,
GeOrc
Friday, December 14, 2018

Executioners - Part II

Initial thoughts
After I had finished the preperations on my executioners unit I can´t resist to paint the first miniature of this unit. Therefore, today I want to write down my experiences with these miniatures. In preperation for the paint job I made a lot of thoughts which colour scheme I should use. I liked the original colour scheme from GW very much, showing them in purple. But this was different to my initial idea for this army, seperating it in a basic part coloured in purple and a Temple of Khaine addicted part coloured in red. Consequently, I thought about red coloured hoddies and cloths fitting to the colour scheme of the witch elves. I stumbled on the beautifully executioner unit from Iain Aitken, who painted an awesome 4th Edition Dark Elves Army. Please check Iains Facebook site and take a look on Iains Miniature Art.

Executioner Unit by Iain Aitken


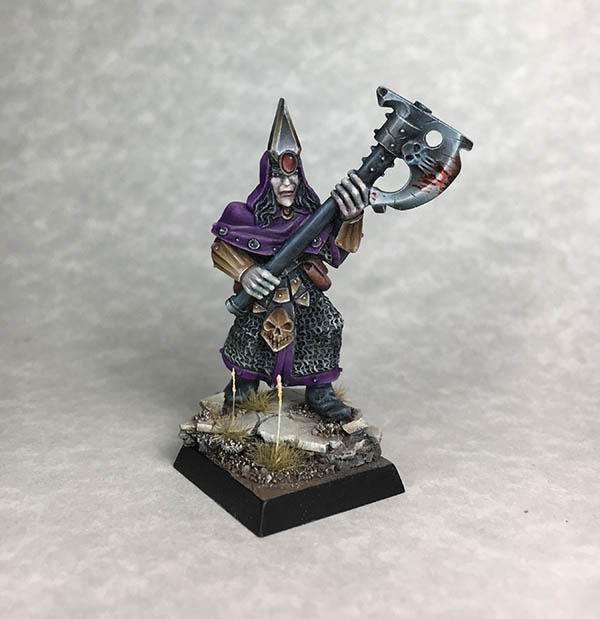
 Iain painted the hoddies red, exactly as I had it planned. His result is stunning, but resulted in a much lighter colour as I had it in my mind. I wanted somethind dark and sinister in its appearance. However, I wanted to avoid black hoddies, as I wanted the hair and the axe shafts in black, ending in a to dark area on the upper side of the miniature. I already made this fault, when painting the first executioners 18 years ago. Finially, the GW colour sheme wasn´t that bad and I gave it a go. Beside the purple for all cloth parts I really liked the golden bracers in this colour scheme.    


The Way of Painting
As always I started with the skin colour based on Bleached Bone with some glazes of warlock purple to add some warmth. Then I started my work on the purple clothes. For my basic colour I used Liche Purple. For the highlights I mixed Liche Purple and Bleached Bone in different variations. For shading I used a mix of Abbadon Black with a bit of Incubi Darkness. I painted the light distribution strict by zenital light rules which resulted in very nice coloured purple hoddy. Finally I added some glazes with Warlock Purple to add some more saturation to the purple. In a next step I painted the black parts consisting of hair, axe shaft, shoes and some smaller parts of his loin decoration. Then I added the gold and the red gems. I used some brownish silver NMM for the chainmail and headdress and a bluish silver NMM for his axe. The last step included the leather, based on Tallarn Flesh, shaded with Scorched Brown and black and Highlighted with Bleached Bone. The Leather was washed with Liche Purple to merge it into the purple colour scheme and some scratched were added for a used look. The base was painted similiar to the others reflecting some High Elves ruins.


I was very pleased how the Executioner turned out. The purple hoddie added some colour and therefore much more character as a black one could add. In contrast to red clothes the purple helped to get the miniature a darker and sinister look. He fits very good between the other miniatures of his gang. He is not that light compared to the with Elves and in my opinion slightly darker than the Champion. The latters appears more shiny as he carries a lot more bling bling with him as reasonable when calling yourself a champion.

Dark Elves Warband

How you think about the colour scheme and how it works compared to the rest of my current Dark Elves warband. Let me know in the comments.
Kind Regards,
GeOrc