Showing posts with label Banner. Show all posts

Friday, November 12, 2021

Dark Elves Sorceress riding Dark Pegasus - Part 2

Darl Elves sorceress riding Dark Pegasus
A further victim of a busy year. I had hoped to finish the final article about painting my Dark Elves Sorceress riding Dark Pegasus earlier. But as mentioned before, my real life required to reduce my spare time in 2021 and my hobby activities and this blog was the first thing I had to silence down. Consequently, I was not able to finish many articles in the last six months. However, things have become better and since a couple of weeks I am back. Time to finish some negelted articles and update some series. The first will be creating my banner for my Dark Elves Sorceress riding Dark Pegasus which I did around one year ago. If you missed the first part of this article, please check this Link here.

The Sorceress riding Dark Pegasus was already painted in January/February 2020. The only parts missing were her banner pole and the banner itself. I took a smal break from the miniature and finished my Dark Elves Warrior Command Crew. With its Standard Bearer I get some additional experience creating the paper banner and thought I was ready for the one of the sorceress. I started designing and painting her banner in the end of March 2020. But my firsdt approach failed and lost the motivation. I concentrated on my unreleased Dar Elves sorceress and Dark Elves Dark Riders instead. With finishing the Dark riders banner I got new motivation and returned to the Sorceress banner end of October 2020. After revision and optimaization of the sketch I painted and finished the Banner. The result was already visible in the picture of my Army Shot in the beginning of 2021. Read here now the detailed story of designing and creating the Banner and see the final pictures of the Sorceress riding Dark Pegasus.


Preliminary Considerations  

From White Dwarf #190

The original Sorceress riding Dark Pegasus came in a box released in White Dwarf #190 in September 1995. Beside the miniature the box also contained a self-adhesive banner which was probably designed by Alan Merrett and painted by Neil Hodgson as most of the Dark Elves shield and banner icons. While I like the majority of these banners a lot, the one from this Sorceress is the weakest in my opinion. I assume the old looking hairy skull should show a stylised hag before blood night. However, I think the icon did not fit for a sorceress and hair and stylised snake ending horns somehow look weird. On the other side the general idea of the skull looking at the brogen heart is nice. But, the banner miss the clarity of the rest of the banner range. Having in mind the parts I like on them I decided to adapt the parts I disliked and design a new version of it, fitting to the banner range. 

Dark Elves Battle Standard
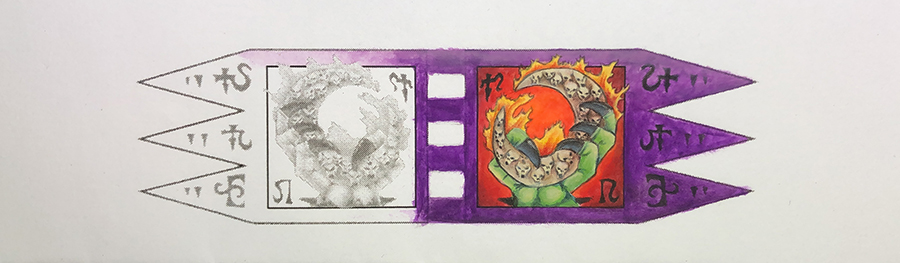
For that I used the Medusa showing Battle Standard. This design became the banner of Ghrond and therefore the banner of the home of the Dark Elves Sorceresses later in Games Workshops Dark Elves history. This made it the perfect icon for a Sorceress. I took the idea of the skulled Medusa head and the original banner design from the Sorceress riding Dark Pegasus and sketched a new banner icon containing the ideas and designs I liked. I started with some simple pen sketches I did during my lunch breaks. After I got a feeling for the otiginal skull design from the Sorceress banner I added the snake hair and the horns from the medusa design. After I had a rough idea of the arrangement I painted one version into the original banner frame.


First sketches of the banner design ideas
 

I scanned that version and used photoshop to mirror the icon into the other side of the banner frame.


Using of Photoshop to mirror the design
 

This version was printed in a very light grey tones.

Very light print of the banner and its design used for painting

I cut out the banner design carefully and used it for a first try to paint it.

Banner ready for painting
 

First Approach

For the painting I cut out the banner as I did with my latest one for the Dark Elves Warriors and started adding colour. Unfortunately, I quickly ran into problems. The paper starts twisting and the colour application became very speckled. What was wrong? It was a different kind of paper I used here. In my previous version I used thicker very qualitative paper with a weight of 100 g because the banner was a one sided hanging banner with straps. The banner here was a double sided one. For that I used thinner standard paper as the banner will get thicker when glueing both sides together. That was the reason it was less stable against twisting. In addition the surface quickly absorbed the water from the colour leading to speckles.

First try and first fail to paint this version of the banner


Probably, with some patience I would be able to save the banner as adding more an more colour would seal the surface and stop further twisting. Moistering the backside and puting it between a thick book for a couple of days would bend it even. But when posting the work in progress banner into my painting group I got some serious critic for the design itself which makes me start thinking to start from scratch. This critic said the snakes of the Medusa head should look into the direction of the heart. It was quickly clear that this would change the whole quality of the banner, as this would increase the interaction between the elements and tell a more comprehensive story.
 

Revision of the Sketch and Final Version

After a couple of days thinking about the needed modifications I gave them a try and used photoshop to rearrange the head position. The new view direction worked fine but the empty space between head and fram further increased. Further modifications were necesarry to make this look good. Therefore, I filled the space with more snake hair and covered that neck part.  

Revised banner design with rearranged head and additional snake hair

 The final design worked well. However, the latest bad experience in banner painting were still in my head. Therefore, I lost my motivation to continue working on this version and put it asaide. It needed a couple of months and some more experience on creating and painting banners to start from scratch. That point was reached after I sucessfully painted my Dark Elves Black Riders Banner. Highly motivated and armed with some new techniques I started that banner anew. 

The Banner was a joy to paint and I had a very fast progress on it. In just one Session I painted a first rough version of the right side. The result looked good but it became clear that the empty space where the shoulder and neck would be situated still looked confusing. Again I used the Battle Standard as reference an added the red shoulder armour from the original design.

The additional element worked fine and served its purpose. However, because the black backgound was already painted on the right side, it became slightly darker on this side of the banner. Having everything together and working now I finsihed the whole banner by doing a lot of detail work in the final steps.

Finally, I compared my final version with my first try and was very happy how my skills developed during that year. That Banner was really a great design and I can´t wait to add it to the Sorceress banner pole.


Comparison of my final banner with the first approach

Final Pictures

As always I cut ou the banner and used PVA glue to add it to the banner pole. Still wet from the glue I bent it in waves to add some dynamic. After the banner had dryed for a day I added the golden edge and some additonal shading to the banner to adapt it to the light situation. Finally, I added some damage in the rear lower corner to give it a bit used look.

Then it was time to add the banner pole to the Sorceress. Carefully, I glued the pole to the backrest. For that I did not used the original knob because this does not fit without bending the banner pole. Instead I glued it on top allowing me to put the banner straight on the backrest without damaging the pole. After everything was done I sat a long time in front of this iconic miniature and starred at what I had created. The result impressed me very much and the miniature was the centerpoint of my Dark Elves Army. She look like a true Herohammer representative of her age, but judge yourself.  


This miniature really had a long journey. I still remember that the first one I painted back in 1998 became a victim of black undercoat instead of vanish. A fatal failure and thorn in my side leading to a bath of aceton a couple of years later. But instead of a new painting she was abandoned in a black box of 5th Edition miniatures. The try to make her a center piece of my 6th Edition army failed and she never was finished. I am more than happy that this shame is deleted in my long list of fails. Now she is having her deserved place in my cabinet leading an army of respectable Dark Elves.

I hope you like the final result as well. As always let me know what you think in the comments.

All the Best,
GeOrc

Sunday, October 10, 2021

Cold One Knights Odyssey

My Cold One Knight unit led by their General
Cold One Knights

Wow, I started this article in July 2019 to report about my progress on the Cold One Knights I made in March 2019. Since that a lot of things happend. First my work on the Cold One Knights were interrupted by painting the Warhydra for the #MakeaTrish painting Challenge in the Oldhammer FB group in April 2019. Second I realized that I miss a Cold One Knight lance type which turned out to be unreleased. I took the time to sculpt a replica of this lance in May 2019. Third, because I was into sculpting I decided to move on with my work on the unreleased Dark Riders. At this point the Cold One Knights were thus far below in my priority list that I skipped them everytime in favor of doing something else. I returned to my Cold One Knights in December 2020 when starting an initative cleaning my workbench of everything which was work in progress. In the first weeks of January I was able to finish two "work in progress" Knights and to rearrange the Cold One Kinghts Champion on his new Cold One. I quickly moved on with the next two Knights for which I had already finished painting the Cold Ones. This work was interupted again in February when finishing a contemporary "work in progress" Death hag for my Daughters of Khaine. End of February I had finished two more knights, but both still miss some work on the pennants and on their shields. Because my job was very exhausting at that time point I had no energy to finish these difficult tasks. Instead I went for the low hanging fruits and painted the Cold One for the Standard Bearer of the unit in March. When writing these lines we have mid of June and I am still working hard to finish my the second pair of Cold One Knights and the Standard Bearer . This would allow me having a full regiment counting six Cold One Knights. Lets see how far I have come and take a look at the details.  

Rearrangement of the Cold One Knights Champion

The Cold One Knights Champion was one of the first miniatures I had painted within this project. At that point the project was not that structured as today. Therefore, it was built with parts I had at hand. With more and more research in the Cold One Knights I wanted to rebuild the studio regiment. But, this required to switch the Champion to another Cold One. Some of you had probably read the article about the planing and initial steps of building that regiment two years ago. This process was performed so far that the Cold Ones changed the Bases but neithter were the bases finished and painted nor was the Cold One of the Champion finished. Additionally the former Cold One missed a new rider. The starting situation of my Cold one Knights regiment was even more chaotic. 

The Cold One Knight regiment on my Workbench in May 2019

Instead of finishing the started Knights with available Cold Ones I painted a further Cold One in May 2019. At this point I had four mostly finished Cold Ones without riders beside a nearly finished Champion on his new Cold One and two Knights work in progress. On each miniature some detail work was still needed. That was how I left this regiment in May 2019 when the lance problem occured.


The unreleased Cold One Knights Lance

When planing the Cold One Knights regiment I did a lot of research on the Studio army. I realized that there is a second Cold One Knight lance, which looks like it was released but was very hard to find. But until today I was not able to find one, neither on the marketplaces nor in anyones collection. Therefore, I think it was a rather unreleased bit, probably due to some casting problems. Already in spring 2019 I realized that this search could take a bit longer. Therefore, I started to sculpt a replica of it. The scultping wasn´t that difficult with having the reference pictures from the catalogue pages at hand. In the end it need a couple of days to have it finished in end of May 2019. 

Sculptured replica of the unreleased lance in comparison to the released one
 

However, I needed at least two of these to copy its appearance in the studio regiment. Therefore, the casting of it would be necessary. But the casting process makes only sense, when you have enough stuff to fill the mold. It needed a whole year and a couple of further projects and its greens and bits to perform this step. In May 2020 I was ready to do the mold making. The lance was very large and I had problems to fit it into my small mold. It was possible but with a very flat angle. I already feared that the casting will become a problem and I should be right on this. I ran more than two dozen castings of the mold and finally get four complete lances from this session. However, that was enough to fulfill my task.


The return of the Cold One Knights       

Due to a lot of other work in progress miniatures it needed until end of the year 2020 before returning to the Cold One Knights. The end of the year is mostly the time I clean my workbench from unfinished stuff. In this regard I had first finished my work in progress Executioners. Then, I started again the work on the Knights. Two were lying around on my workbench half way painted. I started with the one who would carry one of my replica lances. The Knight and his lance were quickly painted. But, I had a lot of troubles with the lance pennants. First, they did not fit properly, then I cut out their fixations to long and had to fill the gap and then the runes in NMM gold did not work. It was a lot of try and error to make this work. I was more than happy, when this guy was finished January 5th. 

Cold One Knight still with gold rune colour

I moved on to the next Knight to reproduce what I had learned. I started with finishing the base of the formerly Champions Cold One which should become his new mount. The Knight was then quickly painted and also the missing parts of the saddle of the Champions Cold One were also finished so that these two miniatures were finished just five days later. It was the end of the first week in January and I had finished work on these three Cold One Knights now standing in front of me on my workbench.


That was a very good start into the new year and into the third year of my 4th Edition Dark Elves army project. Quickly, I moved on with painting the next two knight where I had already the Cold Ones for.


View on my Workbench at January 14th, 2021

But, in contrast to their colleagues their finish took some endless time. I had several breaks on them because I finished / painted other stuff and also private life and my job drained most of my energy. I was able to get one knight on his saddle until mid of march and also the the pennant was already prepared and fixed. But again a difficult time in my private life appeared on the horizon.


The Knights at March 22nd, 2021

During this time it was very hard to motivate myself painting the penannts and shields. Therefore, I continued the work on the other Knight. Motivation and the energy was low and in the rare cases I sat down on the workbench I looked for painting something simple. At that point the Cold One of the Standard Bearer sneaked into my view and took its chance. During this time I painted the Cold One or the remaining knight always in depandance how much energy was left. With the beginning of April I finished the Cold One first and in less distance the knight and put him on his saddle.

Painting the Standard Bearers Cold One and the remaining Knight in the beginning of April 2021

The smiling thirds

While the two unfinished knights still fight for my attention, the Standard Bearers and the next knight which is already part of the reinforcement get on my workbench. After some first painting sessions on both I quickly focused on the Standard Bearer. 

Continue painting the Standard Bearer and more Knights

I had a good start on him but here as well I quickly loose my motivation when life became that hard that I did not paint miniatures for weeks. When I returned to my workbench again I was a bit out of practice and decided to do something completly different. I finished a Realm of Chaos Slaanesh Champion which laid on my pile of shame since 2009 and a couple of Daemonettes for some excercise. One evening I grabbed for the Standard Bearer instead for the next Slaanesh Follower. I had a lot of fun painting all the NMM golds on this evening and I was again on fire. 

Painting the Standard Bearer in end of July 2021

With this experience I went to vacation on the Baltic Sea with my family. We had a very good and relaxing time there. With new energy I returned home and I could not wait to start painting again and to finish the Standard Bearer. Meanwhile it was already mid of July. It took me a couple of painting sessions, before I was able to put him on his Cold One in end of July. 

The finished Standard Bearer between his comrades
 
Banner please!

Now there was only one thing left to fnish this dude. The Banner of the Cold One Knights Standard Bearer. The Banner wich was designed from Neil Hodgson for the studio army is one of the most beautiful ones and is beside his Army Standard my favorite Banner design. The banner design was published in White Dwarf #190. There was need to transfer it to a line template. I used a scan and photoshop to create my template. I adjusted the contrast to very light and printed it. The template was sprayed with three layers of matt vanish to seal the surface. Then I started painting my beloved banner design. Time and motivation was on my side and I fnished the banner in only three sessions in a couple of days in the beginning of August. 


Prepared print of the banner design ready to paint

First half done

Second half done

The finished Banner after adding some more details and corrections

However, two more weeks had gone by until I was able to fix it to the standard and give it its finish.


Freehand madness

Finishing the Standard Bearer was a great motivation. Especially, because the banner turned out that good was a big surprise as I had a lot of respect of its design. I thought it would be good to use the flow and continued with more freehand work. Time to paint one other point on my to do list of things I prefered to skive off... SHIELDS! They should carry also a skull design fitting to their pennant. I had already done one of these designs but I was a bit unhappy because the skull was slightly to large for my taste. This time I wanted to try a bit smaller design. The shields for three were already prepared and painted on their back side. This time I decided to paint them without mask and use freehand skills only.

I also decided to paint them ALL at ONCE to get a highly reproducible result. Therefore, the armory was very busy in the end of august with some Dark Elves shield mass production. The most important thing were the line sizes and arrangements in the beginning to get a reproducible result. Here I really used a ruler to check the correct size and location. Later lines and proportions were estimated. It is important to have a strategy what is drawn in which sequence to get the correct size and proportions. Later stages include corrections using foreground and background and vice Versa to shape the final design. Fine lining techniques were used to define the outlines and details. Blending techniques were used to create attractive areas with depth and details. I put the individual stages on different shields to demonstrate the process. I hope this helps you to get an idea what I had done there. 

Step by step process of the freehand development

One more finished and step by step development of the following

Three skulls finished, rough details on the forth and proportions on the fifth

All freehands finished and the golden edge was added

Finished shields with battle damage


My nemesis

Time to finish my nemesis. Time to finish the two remaining Knights. I started with the "low hanging fruits" and therefore with the Knight who misses only the finish on his pennant and base. The golden outline was added and the light situation on the pennant was adapted in depandance of the drapery. He also get one of my finished shields. At this point point it only takes one painting sessions to finish this guy. Insane that since half a year I was a couple of evenings away from finishing this Knight. But sometimes I have this blockade which need some distance to get through it. I moved on to the last Knight. I painted his pennant which was already prepared and ready for painting since a long time. It took me two small sessions to paint it and fixed it to his lance. Then I gave it its finish and added some more details to the base of the Cold One Knight. Finally, the Knight get also on of the finished shields and he completed my unit of six Cold One Knights.


These pictures just give an overview with the regiment in focus. I have planned to publish some more articles concentrating on single miniatures and groups of miniatures showing these knights more in detail. So far I hope these pictures give you a first impression and I hope you like the result. As always I would be happy to read your thoughts and your feedback in the comments. 

Outlook

People who know the Studios Dark Elves Army know that my unit does not cover it at all. There are some more Cold One Knights and Characters riding Cold Ones and I want them all! I want TEN Knights! That means two more Knights and the Battle Standard Bearer have to be included in this unit. While writing these lines a further Knight is already work in progress. He also will ride a bluish coloured Cold One which is already finished. The Knight is already half way done. The second Knight is ready to get painted. The conversion for the Battle Standard Bearer is finished and I am more than happy with this character. I can´t wait to paint this miniature and I am sure this Dude will become a centerpiece of this regiment and of this army. Here some teaser what will be on the workbench until end of the year.
 
 
 Two teaser pictures will show what will come next and that this regiment is not finished yet

Now I am at the end of this article. It is already clear that finishing this regiment swallowed most on my spare hobby time in 2021. Thanks for joining me on this trip. Thanks a lot for reading and I hope you enjoyed this wall of text and pictures. Stay tuned for the further progress on this mighty regiment.
 
Kind Regards,
GeOrc