Unreleased Sorceress 2 - Part 2
 |
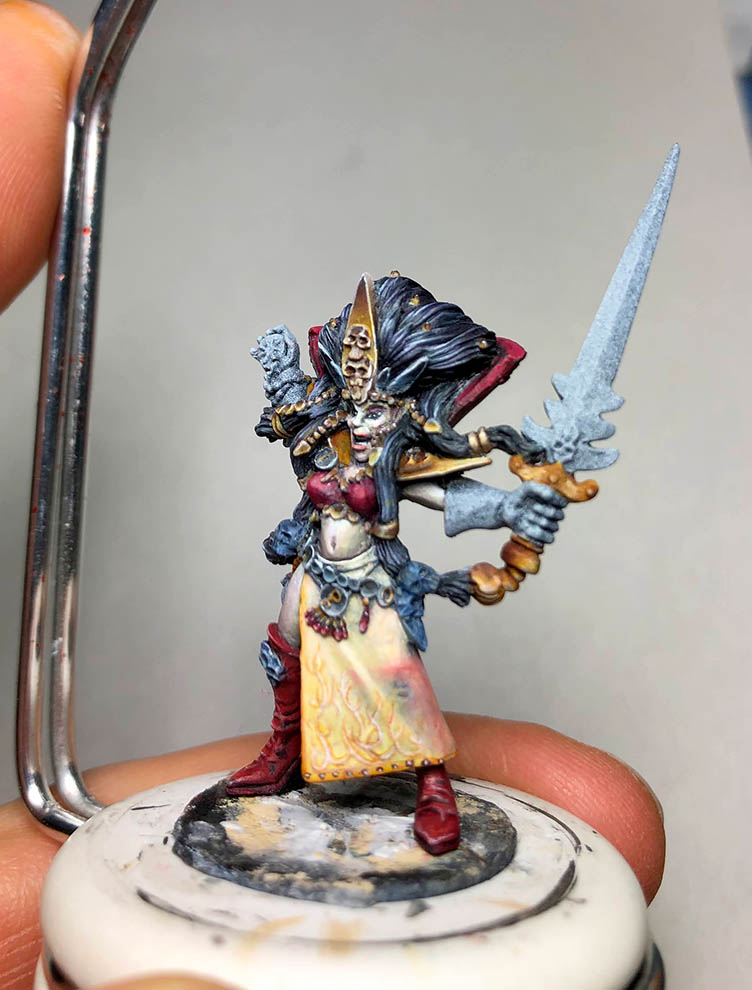
| Unreleased Dark Elf Sorceress (without cloak) |
June 2020 was marked by painting my unreleased Sorceress. A miniature which keeps me busy since many weeks now. in May I already showed the preparation of this miniature. There was a lot of work in cleaning, repairing and basing her. In case that you missed the first part,
see here. This second part will show the final preparations, guide you through the first part of the painting progress and will show my thoughts while painting her.
Motivation and Inspiration
Unreleased miniatures are rare and their painted counterparts are even more rare. Some collectors prefer their miniatures unpainted, others are just bad painters, others fear painting rare miniatures will reduce their value and others just have to much respect of trying to paint them. Therefore, these beeautiful miniatures were often locked away in dark boxes, never seeing the light of a cabinet. But, there also exists a small league of extraordinary collectors who beautifully paint their precious or pay a hugh amount of money to professional painters to let these miniatures become masterpieces. I want to show you some examples of this miniature I cames across through the years. They all did a fantastic job, enjoy!
Unreleased Dark Elf Sorceress from the collection of Remí Oliveras, painted by a befriended french painter
Unreleased Dark Elf Sorceress from the collection of Bruce Faketron, painted by SkitsMix Commissions
My own version

Due to the fact that this lady never appeard in any official Games Workshop publication no Eavy Metal reference material exists of her. Therefore, I am bit more free in the decision for a colour scheme than this projects normally allows me. As allready announced earlier my goal was to paint this Sorceress in
reference to the Sorceress from Dave Gallaghers famous Dark Elves Armybook
cover. This artwork comprised some true challenges when trying to be transfered on a miniature. There is a highly complex loincloth consisting of a highly embroidered part and a lucent part, a collar consisting of delicate lace, a magic effect from her spell weaving hand and a cloak which is screaming for a freehand. I have to say I like nearly everything on this artwork with some small exception and this is the pink sword. I know that coloured swords were a thing in this era, but it doesnt work that good with a modern paint job. But, to get a bit close to this I will try to paint a miorror effect into the swordblade reflecting the reds from her collar in the swordblade. But first, there are some more preparations to be done. There is need to cast the little Cold One, base the miniature and prime her. Lets get started.
Casting the little Cold One
 |
| Centricast Casting and Mold making machine |
This is not my first
moldmaking and metal casting. Back in 2003 after I had sculpted my first
bunch of greens I considered to do miniature design as a professional.
My grandfather supported me and bought me a moldmaking and spin casting
machine. Make a long story short, I decided against it and became a
scientist. However, my moldmaking and spin casting machine has
accompanied me until today and after years unneeded it is spinning
again.
The mold is made using heat-stable RTV silicone. I started
to fill one half of the mold with play dough. Then the greens were put
into the dough. The mold was closed and the RTV silicone was put into
the the empty space above the miniatures creating the first half of the
mold. After the silicon has vulcanized, the mold was seperated and the
play dough discarded. The silicone of the first half of the mold was
treated with a seperation wax to avoid that the silicon for the second half
of the mold reacts with the first one. Everything was closed again and
the second half was filled with RTV silicon. A couple of hours later the
mold can be seperated and the greens were removed. Then there was need
to carve and cut the sprues into the mold. Also I carved and drilled the
air release channels into the mold. The mold was then ready for some
first test casting. I use a white metal alloy with a melting point of
260°C and a casting temperature around 300°C. For the casting the mold
is powdered with Talkum. Then I cast the the metal ito the spinning
mold. The mold was then optimized by improving the sprues and air
channels. This is only a short summery of the process. If you like to
get a more detailed article about mold making and miniature casting let
me know in the comments.
Here the results! Even if some of my greens were very
difficult to cast, the little Cold One made less problems. I was able to
get some proper castings of this complex little Cold One.
Casted bits of the little Cold One
But three
scales located on the snout and on the legs were missing or misplaced.
Probably, damaged by the mold making. I am not an expert and I still
have a lot to learn. I prepared one of the castings, glued the miniature
together and repaired the scales.
The result looks fantastic and I am
very happy to have this little critter as a metal miniature. Having this
little critter casted I had everything at hand to put togehter the
final arrangement of the figures.
Basing


Consequently I arrange everything on a base and start the priming. The miniature with cloak is very large as you can see on the examples above. It is hard to place her on a 20 mm base without enlargement of the base surface. Therefore, I extended the base by two layers of cork. I took care to have enough space for centering the sorceress and putting the right lower cloak tip on the ground. Additionally, there was need to have enough space for placing the little Cold One on the left side. I minimized the cork layers to show the base corners and sides were it was possible. Also I took care that I get two steps on the front view allowing me to reflect the little rise in the ground from the artwork. Building three bases and trying different top layers until I was pleased with the result shows how difficult this steps was. In reference to the artwork I will also try to use a good amount of grass the dark lady stands on. Before that I covered all surfaces with sand and small stones to have a nice underground. After everything was built, I fixed the little Cold One and primed the whole scene making it ready for painting
 |
| Primed base with the Cold One critter, Sorceress and cloak |
Painting the Base and the little Cold One
 |
| WIP of painting the Cold One critter and its base |
In the cover art the little cold one appeared bluish on the lower left corner of the sorceress cloak. For sure it was painted this way to fade into the background while the sorceress dominates the scene. Therefore, I decided to go with my bluish colour scheme I already used on the
General on Cold One. In brief, I started with a basic colour mixed of Regal Blue and Incubi Darkness. The mixture was highlighted with Bleached Bone and used to prime the skin of the cold one. I used the basic colour for shading and added deeper shadows with my shading mixture consisting of Abbadon Black containing a little bit of Incubi Darkness. Then I painted the scales in Incubi Darkness. Each scale was painted as a reflecting material. Therefore, I highlighted the scales with Bleached Bone to the bottom and shaded them with the shading mixture to the top. Finally, the lower scale edges were highlighted with pure white. I added orange coloured eyes and brownish horns to give the little critter its final look. The base was painted exactly like my other High Elves ruin bases with a mixture of grayish stones combined with bone coloured debris. I used a lot of grass to cover the base because I wanted to get it close to the cover art. Consequently, I avoided to much eye catching basing elements to draw the attention on the sorceress and her little pet.
Here some pictures of the finished Cold One critter on the base:
I am really happy how the Cold One turned out and the blue colours had worked very well again. For sure I will also paint a further one using my green colour scheme. I really enjoyed the process of designing, casting and painting a miniature. For sure this won´t be the last miniature design you have seen on this Blog. But, now it is time to get back to the focus of this article, the sorceress herself.
Painting the Sorceress
As usual I started with painting the skin. Here I make one of the less exceptions to the original cover art because I used my typical skin tones to make the sorceress fit into my army. I used my typical receipt based on Bleached Bone tones glazed with Warlock Purple. If you need a more detailed discription for painting light elven skin, just check the labels. In the following painting sessions I wanted to see her head area done and painted her hair, the jewelry and her bra. The latter was done using a red which based on pure Red Gore. Red Gore is a saturated red tone containg some blue making it more cold. Normaly, I reduced the cold temperature of this colour by adding Dark Flesh which is a warmed and desaturated red. The result is a neutral Red. With this miniature I wanted to play with different red tones from different colour temperatures as done in the cover art. This will be a break with the rest of the army colour scheme but in this case I decided for going with the reference. The next element I wanted to paint was the loincloth. In preparation for that I painted the boots with a warmer reds using my typical red tones but adding the highlights with Blood Red and a Blood Red and Golden Yellow mixture.


Painting the loincloth
Retrospectively, the loincloth was the most difficult part on this miniature. On the cover art it looked like consisting of two different materials, a golden one with
delicate embroideries and a transparent one covering her left leg. In contrast the miniature only has a skirt which is one sided open. Therefore, there was need to combine both materials from the reference and transfer that on the miniature. For the golden tones I used my typical NMM gold colours. I started with the very light yellow mix as a base colour. Then I added the embroideries using Snakebite Leather. Looking at the cover art, it is not possible to get an idea of the original pattern because of the drapery. Therefore, I decided to use the typical flame motiv which was used several time as an element of the 4th Edition Dark Elves by Aly Morrsion. The transparent effect I get by glazing the warm red tones from the boots on these parts were the boot displayed under the skirt.The skull from the boot was painted freehand into the right position using Shadow Gray which contrasted perfectly to the warm tones.


After the rough idea was realized on the miniature the detail work started. I used finelining techniques to give the
embroideries a much more
delicate look. Additionally, I highlighted the skirt a lot to make it softer. The transparent effect was intensified by adding the skin tones to the leg and adding shadows with thinned Shadow Gray to deepen areas with no background which could shine through. I also added some Dwarf Flesh here and there to add some warmth from diffuse reflection from the red boots. The edges I painted Snakebite Leather and added freehand painted rivets on the lower edge. Here a some final pictures of this step:
I was very happy with the result at this stage. That transparent effect was a fantastic eyecatcher and it was already clear that it will dominate the result in the end.
Painting the gloves
One of the main differences between the cover art and the miniature are the gloves. I assume Dave Gallagher did not like them and indeed beside all the filigree details the clumsy gloves look a bit misplaced. From my talks with Aly I know that the bigger hands of the past were often used to ensure a completee casting of the weapons. Putting the hands in gloves reduced a bit their disproportional size. However, even with gloves this part did not fit very good with the rest of this elfs slender shape. That´s propably why Dave decided to go with a very reduced version of a glove, more jewelry than something covering the hands. This brought me the idea to paint the gloves in a lace or net style with open fingers. For that I started to paint the gloves in my skin colours. Then I used a finelining technique to add very thin lines wiht the brush on the surface. I placed them in a curved way to avoid a boring look. Finally I shaded the lower parts of the glove highlightening her arms which helps to reduce the bulky look of the shape. I tried to add some lace details, but this got to busy and I dropped the idea and stayed with the net look only.


I am very happy with the result. It is a fine example how a painting can be used to change the expression of a detail on a miniature. That´s why I still think that this detail is one of the best on this miniature.
Painting the collar
Here the idea was to create something similiar as the lace collar from the cover art. I decided to use the red background colour from Daves cover art as a underground for my freehand pattern. I started painting the collar already a few steps earlier. I added the basic colour which is similiar to the bra. Then, I thought how I could add a black lace pattern to this detail. Because
the front view is dominated by her black hair I dropped the idea to
paint that pattern also on the front side. Additionally, I needed some
contrast between hair and collar and was happy to have that with the red colour. I painted the sculpted details on the backside in black and added differen lenghts of black lines which I decorated with arrow heads. I used grey tones to add some reflections of the material. The small pearls on the sculpted details I painted in light bluish colours.

In comparison with the other details thisone get a bit lost. However, I am very happy to have added it because I dislikd the free space of the collar in comparison to the fantastic decorations Aly sculpted on its top. This way the whole collar gets a very filigree look helping to reduce a further limitation of the figure.
Painting the amulet and sword
Next on my to do list were the amulet and the sword. Both elements shared some special translation in Dave’s cover art. The amulet was replaced by a lightning effect and the sword was decorated with a lot of ornaments and coloured pink. Again I tried to get somehow close to the artwork. Therefore, I painted a object source lightning (OSL) effect to the amulet. The amulet itself was painted golden with a blue shining rune on it. I used a lot of blue glazes of Lightning Blue and Regal Blue to colour the reflections on the surrounding. Unfortunately, there aren’t much surfaces which can support the effect. Therefore, the effect isn’t very eye catching and a bit disappointing.

I have allready admitted that I am not a great fan of the pink sword. It is one of the few elements of Dave’s breathtaking artwork which I really dislike. That’s why I decided against a completely pink coloured one but thought it could pay the pink justice by painting the red reflections from the collar into the sword. For that I started to paint the sword my usual greyish way and then quickly added glazes of Red Gore. I also give the ornaments a try but terribly failed because these completly destroyed the NMM effect. The latter was more important for me and consequently I painted that sword NMM a second time.
Finally, there were some details left like the bag and some jewelry. After the miniature was declared to be finished it was time to put her on her base. I was very excited and after weeks of painting the moment had come to join the sorceress and her pet. It was a joy to see them combined. Now the only thing missing was the cloak!
But, before I will start to paint the cloak I will make a cut here. Because the cloak will finally cover a lot of the miniature I want to show her first without it. Therefore, here some final pictures of part 2
I hope you like my progress so far. Maybe you have already spotted the finished version showing up in my instagram preview on the top of this site. If so, you eill slready know what part 3 of this miniature will be about. Stay tuned for the cloak and the finished miniature!
As always I would be happy to read you thoughts in the comments.
Kind Regards,
GeOrc